Before you walk into the DriveTest centre, you want to know exactly what score you need to pass. Vague ideas about "doing well" or "getting most questions right" do not help you prepare effectively. You need specific numbers to target.
The G1 test has clear passing thresholds, but they work differently than a typical exam where you just need a certain percentage overall. Ontario's G1 test requires you to meet the passing standard on two separate sections independently. This structure trips up people who assume a high score on one section can compensate for a weak score on the other.
This guide explains exactly what scores you need, how the scoring works, and what happens in various pass and fail scenarios.
The Passing Threshold
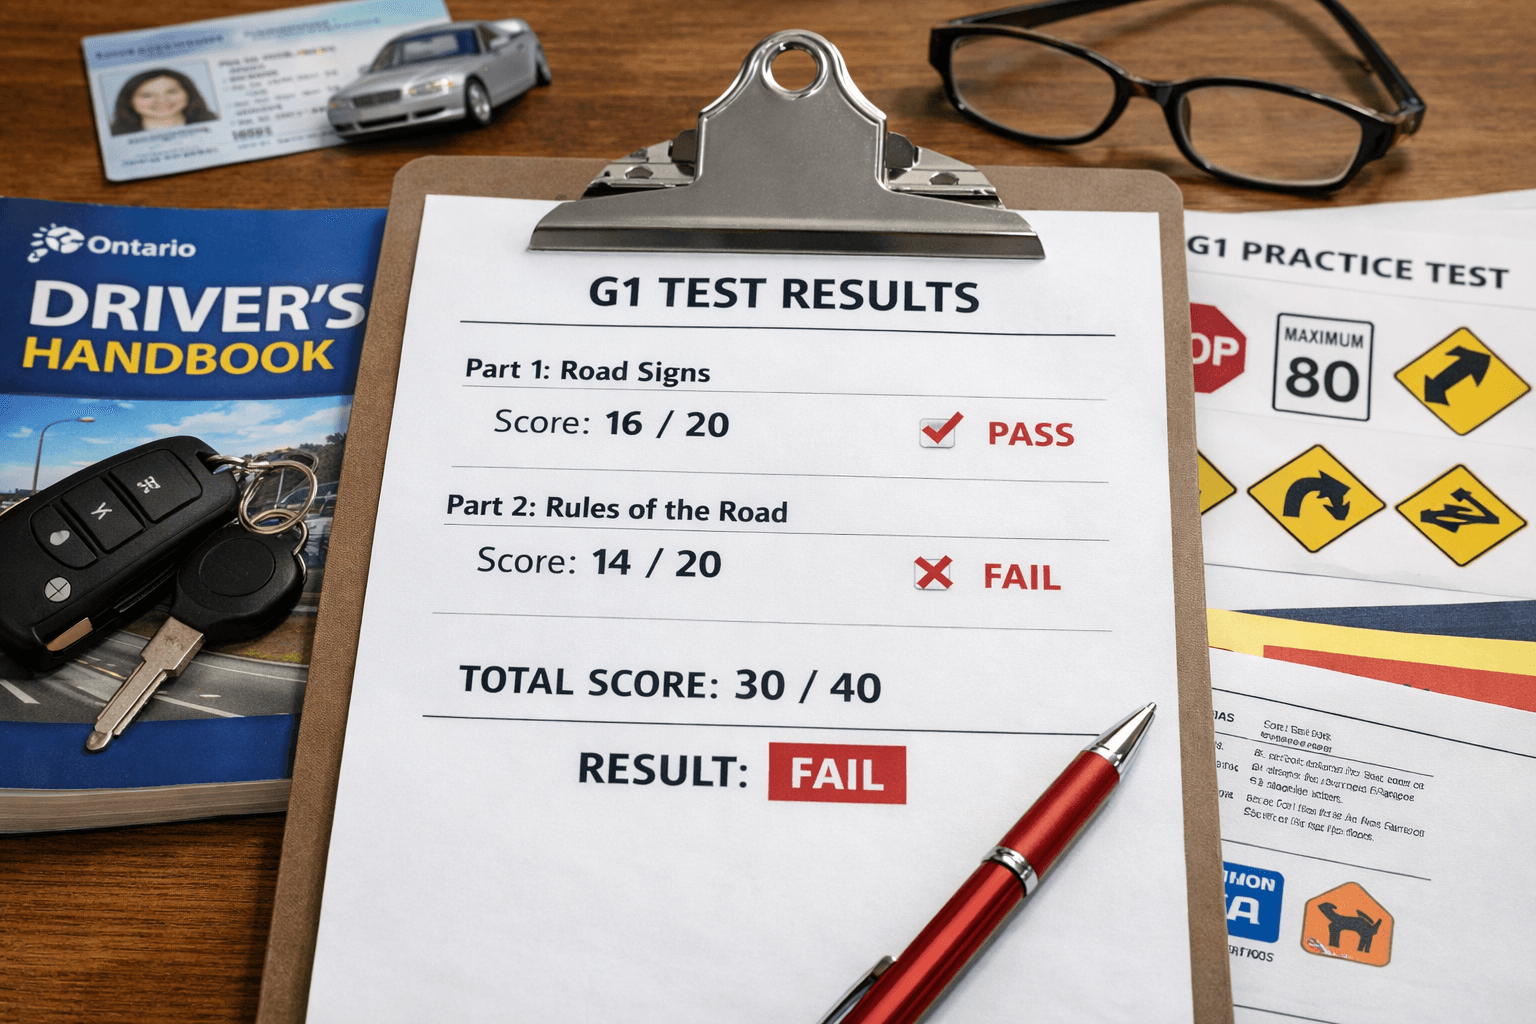
To pass the G1 test, you must score at least 16 out of 20 on each section. That means 16 correct on road signs and 16 correct on rules of the road.
In percentage terms, 16 out of 20 equals 80%. You need 80% or higher on both sections to pass the test. Scoring 79% or below on either section results in failure.
This 80% threshold is not negotiable. There is no curve, no adjustment based on how other test takers performed, and no rounding up if you score 15.5 somehow. You either hit 16 or you do not.
The passing score has remained consistent for years. When you see practice tests or study materials referencing different numbers, they may be outdated or based on other provinces' requirements. For Ontario's current G1 test, 16 out of 20 per section is the standard.
How the Two Sections Work
The G1 test contains 40 questions total, divided evenly into two sections.
Section one has 20 questions about road signs. These questions show you images of traffic signs, signals, and pavement markings. You identify what they mean or what action they require from drivers.
Section two has 20 questions about rules of the road. These questions cover traffic laws, safe driving practices, right-of-way rules, and how to handle various driving situations.
Each section is scored independently. Your performance on signs has no effect on how your rules score is calculated, and vice versa. The computer tallies your correct answers in each section separately and compares each total against the 16-question minimum.
This independent scoring is where many people get caught. You cannot bank extra points from a strong section to cover weakness in the other section. The math simply does not work that way.
Pass and Fail Scenarios
Understanding how different score combinations play out helps clarify what you are aiming for.
Passing scenario: You score 18 on road signs and 17 on rules. Both scores meet or exceed 16, so you pass the test. Your G1 license is issued.
Failing scenario - one section short: You score 19 on road signs but only 14 on rules. Despite your excellent performance on signs, you fail because rules fell below 16. The outstanding signs score provides no benefit.
Failing scenario - both sections short: You score 15 on road signs and 15 on rules. Both sections missed the threshold, so you fail. This sometimes happens to people who studied superficially across both areas without mastering either.
Failing scenario - barely missing one section: You score 17 on road signs and 15 on rules. Missing by a single question still counts as failing. There is no "close enough" exception.
Minimum passing scenario: You score exactly 16 on both sections. This is a pass. You do not need to exceed the minimum. Hitting 16 and 16 earns your G1 just as surely as hitting 20 and 20.
The test does not weight questions differently. Every question counts equally within its section. Missing an "easy" question hurts your score exactly as much as missing a "hard" one.
Why 80% Per Section?
The 80% threshold reflects Ontario's judgment about what level of knowledge indicates readiness to begin supervised driving practice.
Allowing 4 mistakes per section acknowledges that test anxiety, tricky wording, or momentary confusion can cause errors even among well-prepared test takers. A single missed question does not indicate fundamental lack of knowledge. But missing more than 4 in a section suggests gaps that need addressing before someone starts driving.
The per-section requirement exists because both knowledge areas matter equally. A driver who recognizes every road sign but does not understand traffic laws is dangerous. A driver who knows all the rules but cannot identify warning signs is equally dangerous. Safe driving requires competence in both areas.
Some test takers wish the sections could offset each other. From a safety perspective, this makes no sense. Knowing extra signs does not make up for not knowing when to yield at an intersection. The independent scoring reflects the independent importance of each knowledge area.
What Your Score Means
Your raw score tells you how many questions you answered correctly. Beyond pass or fail, this number provides useful information.
16 to 17 correct in a section: You passed but with limited margin. Your knowledge base may have gaps that could cause problems during actual driving. Consider reviewing weak areas even after passing.
18 to 19 correct in a section: You demonstrated solid knowledge with room for minor errors. This score range suggests genuine understanding rather than lucky guessing.
20 correct in a section: Perfect score. You either knew the material extremely well or got fortunate on any questions where you guessed. Either way, no improvement needed in that area.
14 to 15 correct in a section: You failed but came close. Focused review of your weak areas should prepare you to pass on a subsequent attempt.
Below 14 in a section: Significant gaps exist in your knowledge. More comprehensive studying is needed rather than just reviewing a few topics.
When you fail, the results screen shows your score for each section. This feedback tells you where to focus your preparation before retesting. Someone who scored 18 on signs but 12 on rules should concentrate almost exclusively on traffic laws for their next attempt.
Score Display and Feedback
After completing both sections, the computer displays your results immediately. You do not wait days to find out how you did.
The results screen shows your score for each section as a number out of 20. You can see exactly how many questions you got right in road signs and how many you got right in rules.
The screen indicates whether you passed or failed based on whether both scores met the 16-question minimum. The pass or fail determination is automatic and immediate.
What you do not see is which specific questions you missed. The test does not provide an item-by-item breakdown showing which answers were wrong. You know you missed 3 questions in rules, for example, but not which 3 topics those questions covered.
This limited feedback makes targeted improvement harder after a failed attempt. You know which section needs work but not which specific topics within that section caused problems. Broad review across the weaker section is usually necessary rather than surgical correction of specific gaps.
How Passing Scores Compare to Practice Tests
Practice test scores give you a reasonable prediction of how you will perform on the real test, but some variation is normal.
If you consistently score 18 or higher on both sections of practice tests, you are likely ready to pass the real thing. Consistent high performance indicates solid knowledge that should transfer to the actual exam.
If you hover around 16 on practice tests, you have a reasonable chance of passing but no safety margin. A few unlucky questions or a momentary lapse could drop you below the threshold. More preparation would reduce your risk.
If you score below 16 on practice tests, you are not ready. Taking the real test in this condition wastes money and time. Continue studying until practice scores reliably exceed the passing threshold.
Practice tests vary in difficulty and accuracy. Some are easier than the real test while others are harder. Taking multiple practice tests from different sources gives you a better sense of your true readiness than relying on a single practice test score.
Aiming Higher Than the Minimum
Smart test takers do not aim for exactly 16 out of 20. They aim higher to create a buffer against unexpected mistakes.
Test conditions differ from practice conditions. The DriveTest centre environment, the pressure of a real exam, and the specific questions you happen to receive can all affect performance. People sometimes score lower on the real test than on practice tests.
If you aim for 16 and have a bad day, you fail. If you aim for 18 and have a bad day, you might still hit 16 and pass. The margin matters.
Study until you consistently score at least 18 out of 20 on both sections of practice tests. This level of preparation gives you room to absorb some errors on test day while still passing.
Overpreparing beats underpreparing. The cost of extra study time is small compared to the cost of failing, rebooking, and retesting.
What Happens When You Pass
Passing the G1 test with the required scores in both sections triggers the next steps in the licensing process.
The DriveTest staff directs you to have your photo taken for your license. This photo appears on your G1 card and carries forward to your G2 license when you eventually pass that road test.
You receive your G1 license, either as a physical card that day or through a combination of temporary documentation and a card mailed to your address. Procedures vary by location.
With your G1 in hand, you can immediately begin practicing driving under supervision according to G1 restrictions. The score you achieved beyond the minimum has no ongoing effect. Someone who scored 16 and 16 has exactly the same G1 privileges as someone who scored 20 and 20.
What Happens When You Fail
Failing to reach 16 in either section means no G1 license that day.
You cannot retest immediately. DriveTest requires waiting until at least the next day before attempting the test again. This waiting period gives you time to study the areas where you fell short.
You must pay the licensing fee again for each retest attempt. The fee you paid for your failed attempt is not refunded or credited toward future attempts. Multiple failures become expensive.
There is no limit to how many times you can attempt the G1 test. Some people pass on their first try while others need several attempts. Each attempt is a fresh opportunity with a new set of questions.
Use the feedback from failed attempts productively. If you failed the rules section, spend your study time on traffic laws rather than road signs. If you failed both sections, you need comprehensive review across all topics.
Most people who fail once and study seriously before retesting pass on their next attempt. Failure is frustrating but not permanent.
Confirming Your Readiness
Before booking your G1 test, confirm that your practice scores indicate readiness.
Take multiple practice tests under realistic conditions. Time yourself, put away study materials, and answer questions without looking anything up. Track your scores by section separately.
If you score 17 or higher on both sections across multiple different practice tests, you are ready. If scores fluctuate between passing and failing, continue studying until results stabilize above the threshold.
Do not book your test hoping to get lucky. Hope is not a strategy. Preparation is.
Ready to see whether your knowledge meets the passing standard? G1 Ready CA offers practice tests that score your performance by section, just like the real exam. For a complete breakdown of how the test is structured and what each section covers, review the guide on how many questions are on the G1 test to understand exactly what you are preparing for.


