Red means stop safely now, amber means have it checked soon, and green or blue means a system is active. Start with that rule, then use the lookup table below to name the symbol and choose your first move.
You're likely reading this parked with the engine running, staring at a light you don't recognise and wondering whether you can finish the trip. Don't guess from the shape alone. Note the colour first, check whether it's steady or flashing, and only then look up the picture. That order keeps a minor reminder from causing panic and a serious fault from being ignored for another week.
Warning Symbols at a Glance
A warning symbol in car dashboards is often called a tell-tale. It lights when a system is active, isn't working correctly, or has failed, so both its colour and its shape carry information. Colour sets urgency before you know the cause. Shape tells you which system needs attention.
Use the three-colour rule every time:
- Red means stop now: Stop safely as soon as conditions allow. Red is reserved for faults that can damage the engine, remove braking power, or put people at risk.
- Amber means act soon: Drive gently, avoid heavy loads and high speeds, and book a diagnosis. A few amber lights are only information, such as low fuel, but you still need to act on them.
- Green or blue means information: A function is switched on. There's no fault to repair, although you may need to turn that function off, as with high beams in traffic.
Common Warning Symbols by Colour, Severity and First Action
Symbol Colour Severity Immediate action Oil pressure warning Red Stop now Stop safely, switch off engine, check oil level after it cools Engine coolant temperature Red Stop now Stop safely, switch off, wait before opening the cap Battery and charging system Red Stop now Cut electrical loads and drive straight to a service point Brake system warning Red Stop now Confirm parking brake is off; if pedal feels soft, stop and call for a tow Airbag (SRS) warning Red or amber Act soon Book an inspection; airbags may not deploy in a crash Seatbelt reminder Red or amber Information Fasten the belt before moving Check engine (malfunction indicator) Amber Act soon Steady: reduce load and book a scan. Flashing: reduce speed and stop when safe Tyre pressure monitoring (TPMS) Amber Act soon Check all four tyres cold and inflate to the placard pressure Anti-lock brake system (ABS) Amber Act soon Normal braking still works; get the fault diagnosed Low fuel Amber Information Refuel at the next safe opportunity Traction or stability control Amber Information Flashing is normal on slippery roads; steady means a fault or system off Headlamps on Green Information No action; confirm rear lights are lit
This table gives only the first move. It doesn't diagnose the cause. A red brake light, for example, might mean the parking brake is still on, which you can fix in seconds, or brake fluid is low, which you cannot judge from the driver's seat. That's why the first action starts with a simple check and then tells you when to stop and call for help.
How to Use This Table While Parked
Park safely before you study the table. Don't scroll, zoom, or compare tiny icons in moving traffic. If you're already driving and see red, ease off the accelerator, look for a safe place to stop, and deal with identification after you've parked.
Note the colour before you try to name the symbol. Colour tells you whether you have seconds, days, or no problem at all.
Icons and wording vary by make and model year. One manufacturer may draw an oil can with a wavy line under it, another may add the word OIL. If the symbol in your owner's manual legend disagrees with any general chart, follow the manual. The manual was written for your exact vehicle, including its engine, options, and instrument cluster.
Keep this lookup for parked checks and for G1 study. Ontario learners are expected to know their vehicle's controls and instruments before driving independently, and recognising these twelve symbols covers most lights you'll meet in ordinary driving. If a light isn't listed, don't assume it's harmless. Use the fallback steps for unknown symbols and let colour decide what you do next.
Colour, Pattern and Timing Change Urgency
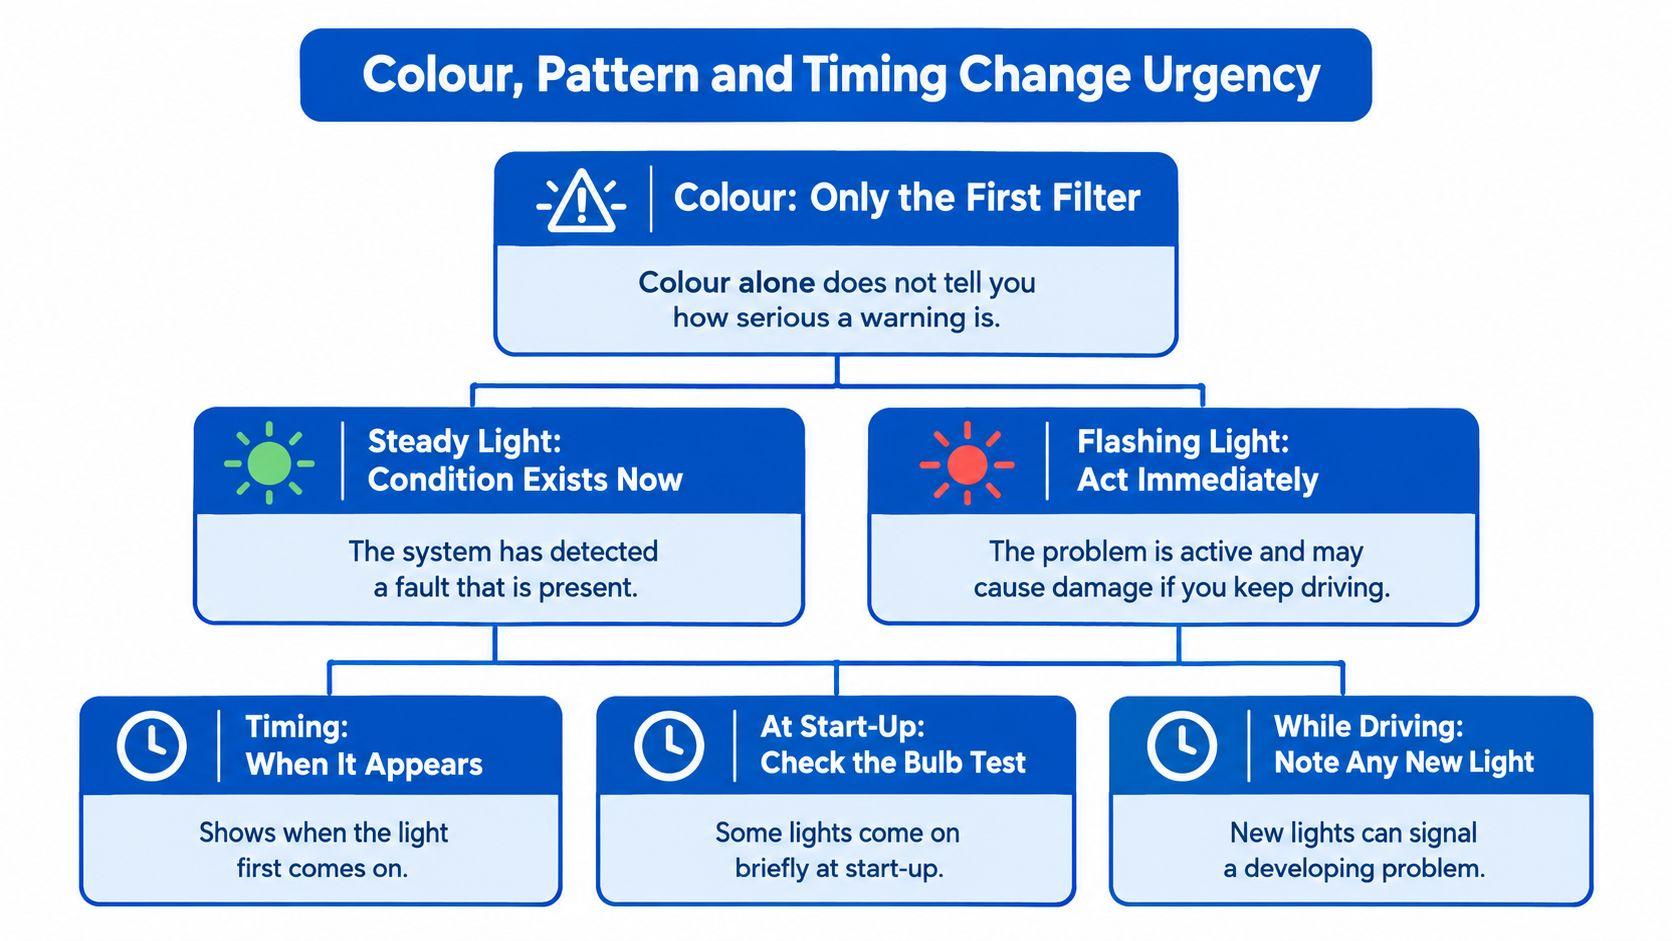
Colour is only the first filter. The same icon can require different actions depending on whether it's steady, flashing, or only present at start-up. A steady light usually reports a condition that exists now. A flashing light usually reports a problem that's active or getting worse while you watch it.
Canadian vehicle regulations define a tell-tale as an optical signal that communicates the actuation of a device, correct or improper functioning or condition, or a failure to function, and Transport Canada's standard for controls, tell-tales and indicators sets requirements for location, identification, colour, and illumination. That standardisation helps you interpret symbols across vehicles sold in Canada, but the manufacturer's instructions still determine the exact response for your car.
Steady Versus Flashing
The check engine light shows the difference clearly. Say you're on a highway trip and an amber engine outline appears and stays steady while the car drives normally. The engine management system has logged a fault. Reduce load, avoid towing or hard acceleration, and book a scan. You don't need to stop on the shoulder for that alone.
Now say the same amber light starts flashing and the engine feels rough. That's an active misfire. Unburned fuel can reach the exhaust and damage components quickly. Reduce speed, ease off the accelerator, and stop when it's safe. Same icon, same colour, different pattern, different urgency.
Traction control works in the opposite direction. Flashing is often normal because the system is actively helping on snow, ice, or gravel. A steady traction light in dry conditions is the one that suggests a fault or that the system has been switched off. Pattern matters, but you still need to know what normal looks like for that system.
Timing and Multiple Lights
At key-on, many lights illuminate for a few seconds. That's the bulb check, and it's normal. A light that appears at start-up and goes out tells you the bulb and the self-check are working. A light that stays on after you move away is a continuing warning.
Timing also affects risk. An amber light in a parking lot lets you look up the manual before you move. The same light during a long highway run, far from services and at high speed, may justify stopping at the next safe exit rather than pushing on.
When two lights appear together, read the red one first. Treat the amber one as a clue to its cause. A red battery light with several amber warnings, for example, often points to one electrical problem affecting many systems rather than many separate failures.
Some manufacturers show airbag or ABS faults in red, and a few use different colours for the same icon. If colour and shape seem to disagree, the owner's manual legend settles it.
What to Do When a Symbol Is Not in the Chart
Modern cars have symbols for driver-assistance systems, diesel filters, hybrid batteries, lane keeping, and features that didn't exist a decade ago. No general chart can list them all. Use this four-step fallback for any unfamiliar light.
The Four-Step Fallback
- Note colour, shape, and pattern: Write down whether the light is red, amber, green, or blue, what it looks like, and whether it's steady, flashing, or only at start-up. Take a photo while parked if you can do so safely.
- Search the owner's manual index: Look for warning lights, indicators, or instrument cluster, then read the legend page. The legend overrides general charts because it matches your make, model, year, and trim.
- Search the manufacturer's website: If the printed manual is missing, search the make, model, and year with the words dashboard warning lights on the manufacturer's official site. Avoid guessing from a photo of a different model year.
- Let colour decide if you still don't know: Treat an unidentified red light as stop now. Treat an unidentified amber light as a diagnosis within days, sooner if the car feels, sounds, or smells different.
Practical rule: An unidentified red symbol is never a light to ignore until the weekend. Red is reserved for conditions that can cause damage or a crash.
The Ontario Handbook instruction to watch for lights that stay on after driving away applies to unknown symbols too. You don't need to name a light perfectly to respond safely. You need to notice that it's still there, judge its colour, and reduce risk.
Don't expect the shape to identify the exact fault. A check engine outline tells you the engine management system has stored a fault, but it doesn't tell you whether the cause is a loose fuel cap, a sensor, or a misfire. The cause comes from a code scan or an inspection, not from staring harder at the icon. Your notes on colour, pattern, and when it appeared help a technician start in the right place.
Engine, Battery and Cooling Symbols Explained
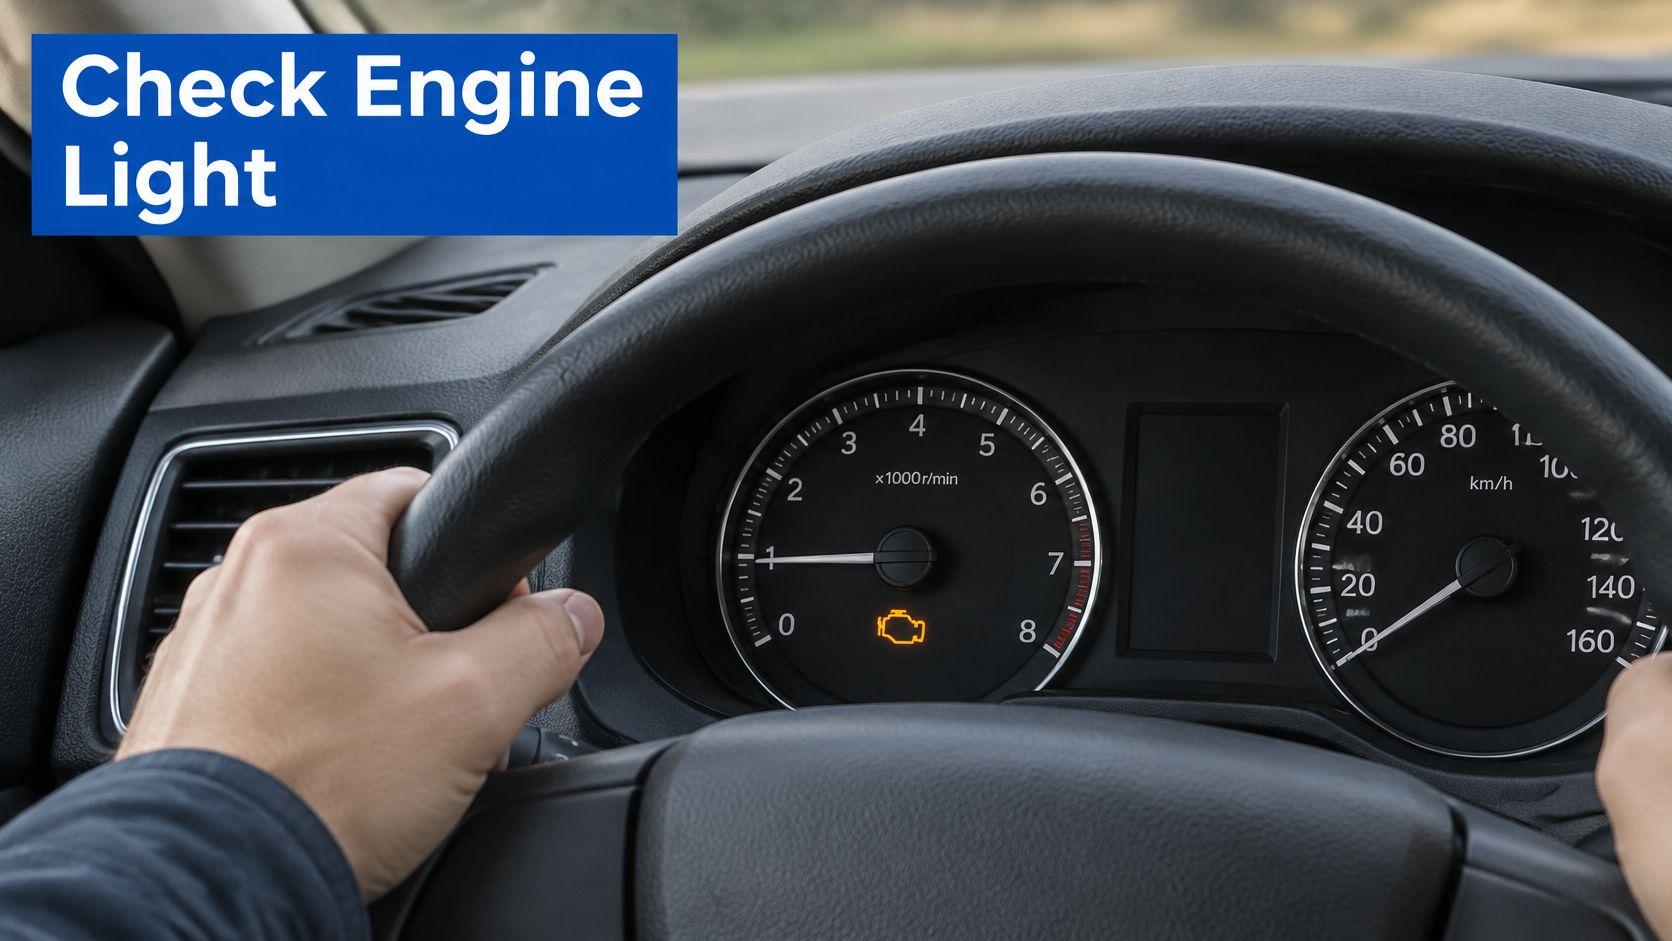
These symbols protect the systems that keep the engine running without destroying itself. Read each entry in the same order: picture, colour, meaning, likely cause, and action. The amber check engine light below is the one drivers ask about most.
Check Engine, Oil, and Coolant
Check engine (malfunction indicator) is an amber engine outline. Steady means the engine management system has logged a fault. Common causes include a loose fuel cap, an oxygen sensor fault, or a misfire. Tighten the fuel cap until it clicks if you've just refuelled, drive gently, and have the code read at a parts store or shop. A code points to a system, but it isn't a complete diagnosis by itself.
Oil pressure is a red oil can, sometimes with a drop. It means low oil pressure, not just low oil level. Stop safely, switch off, wait about five minutes so oil drains back to the pan, then check the dipstick on level ground. Continuing to run an engine without proper oil pressure can seize it. If the level is correct and the light returns, don't keep restarting and hoping. Arrange a tow.
Say a driver sees the oil icon at a highway rest stop. The right move isn't to add oil blindly and leave. Switch off, wait, pull the dipstick, wipe it, reinsert it fully, and read the level again. If it's below the minimum mark, add the grade listed in the manual a little at a time and recheck. If it's already full, the problem is pressure or circulation, and the car needs inspection.
Engine coolant temperature is a red thermometer in liquid. Stop, switch off, and leave the hood closed until the engine cools. Never open a hot coolant cap, because pressurised coolant can spray and scald. Look for obvious leaks or steam only after things cool, and don't pour cold water into a hot, empty system unless the manual tells you how.
The short video below reviews how these engine warnings look on a real cluster, which helps when you're learning to separate similar outlines at a glance.
Battery and Diesel Glow Plug
Battery and charging is a red battery outline with positive and negative marks. It usually means the alternator isn't charging, so the car is running on battery power for a limited time. Turn off heated seats, air conditioning, and the rear defroster to cut electrical load. Don't switch the engine off in traffic if you may not be able to restart. Drive straight to a service point if it's close and the car is otherwise driving normally.
Diesel glow plug is an amber coil that looks like a small spring. Wait until it goes out before cranking a diesel engine, especially in cold weather. If it flashes while driving or stays on, the glow plug or engine management system needs diagnosis.
For G1 learners, these symbols belong with the Ontario Handbook material on vehicle controls and instruments studied before supervised driving. You're not expected to repair an alternator at the roadside. You're expected to recognise that red oil, temperature, and charging warnings change what you do next.
Brake, Airbag and Seatbelt Symbols Explained
Start with the failure that can stop you from stopping. The other systems in this family reduce injury or help you keep control, but a brake fault changes whether the car should move at all.
Brakes, ABS, and Stability Control
Brake system is a red circle with an exclamation mark inside brackets, although some cars use the word BRAKE. First confirm the parking brake is fully released. If the light stays on with the parking brake off, brake fluid may be low or there may be a hydraulic fault. Test the pedal carefully while stopped. Treat a soft or spongy pedal as an emergency, stop, and arrange a tow rather than pumping the pedal and continuing.
Anti-lock brakes (ABS) is an amber circle with ABS inside brackets. Ordinary braking still works, but the system may not prevent wheel lock in a hard stop. Drive gently, leave more following distance, and book service. On wet or snowy roads, that lost wheel-lock protection matters most, so slow down earlier for intersections and curves.
Traction or stability control shows a car with wavy skid marks behind it. Flashing means the system is working on a slippery surface. Ease off the accelerator and steer smoothly. A steady light means a fault or that the system is switched off. Check that you haven't pressed the traction control button by accident before assuming a sensor has failed.
Airbags and Belts
Airbag (SRS) shows a seated figure with a large curved shape in front, representing a deployed airbag. It may be red or amber depending on the manufacturer. If it stays on after the start-up check, the supplemental restraint system may not deploy properly in a crash. The car may drive normally, but book an inspection promptly. Don't probe airbag wiring or disconnect components yourself.
Seatbelt reminder shows a seated figure wearing a belt. Fasten it before moving. Some cars chime until every occupied seat is belted, and a heavy bag on an empty seat can fool the sensor. If the light stays on after everyone is belted and the seats are clear, have the buckle and sensor checked.
A car can drive perfectly with an airbag light on and still fail to protect you in the one moment the system exists for.
Passenger airbag off is usually amber text or a figure with OFF. It shows whether the front passenger airbag is disabled. That matters when a rear-facing child seat is fitted in the front, because a deploying airbag can injure the child. It also matters in the opposite situation. An adult passenger shouldn't ride with the airbag unknowingly switched off.
These symbols connect directly to G1 topics on seatbelt rules and vehicle safety equipment. Test questions often ask what a light means, but the road version is simpler. Red brake means check the parking brake and pedal feel now. Amber ABS means braking help is reduced. Airbag steady means protection may be missing even though nothing feels wrong.
Tyre, Fuel and Fluid Symbols Explained
Most lights in this family can be checked in minutes with a tyre gauge, the placard on the door frame, or a bottle of the correct fluid. The fix belongs in the same sentence as the meaning because waiting rarely improves any of them.
Tyres and Fuel
Tyre pressure monitoring (TPMS) is an amber tyre cross-section with an exclamation mark. Check all four tyres when they're cold, before driving warms them, and inflate to the placard pressure on the driver's door frame, not the maximum pressure moulded into the tyre sidewall. Use a simple stick or digital gauge rather than judging by eye, because a tyre can look fine while it's well under pressure.
In a hypothetical cold-snap example, pressure falls by 1 psi (roughly 7 kPa) for every 10°F (about 5.5°C) drop in temperature, which is why the light often appears on the first cold morning of an Ontario autumn. If TPMS flashes for about a minute, then stays steady, that pattern signals a sensor or system fault rather than low pressure alone. Check pressures manually anyway, then have the system diagnosed.
Say a driver checks tyres at a gas station after a cold morning and finds one tyre 20 psi below the placard figure in a worked example. That isn't a weather quirk to ignore. Inflate it, inspect for a nail or sidewall damage, and recheck it the next morning. Rapid loss means a leak, not temperature.
Low fuel is an amber fuel pump icon. Refuel at the next safe opportunity. Remaining range varies by model, driving style, and terrain, so don't treat another car's range as your own. The small arrow beside many fuel gauges points to the side of the car where the fuel door is located.
Fluids, Steering, and Service Reminders
- Windshield washer fluid: An amber windscreen with spray lines. Top up with washer fluid, not water alone, because proper fluid cleans better and resists freezing.
- Power steering: An amber steering wheel with an exclamation mark. The car still steers, but assistance may be reduced. Steer gently, expect heavier effort at parking speeds, and have it checked.
- Maintenance reminder: A wrench or oil can with a mileage message. A service is due. That's information, not a breakdown warning, but don't confuse it with the red oil pressure light.
These checks fit the G1 topic on pre-drive vehicle checks. A learner who can find the tyre placard, use a gauge, and tell a service reminder from a pressure warning is already doing the practical work behind the test questions.
Lighting and Hazard Symbols Drivers Mix Up
A bright dashboard doesn't prove your headlights and taillights are on. That single mistake explains many cars driving at dusk with a lit instrument panel and a dark rear end that's hard for following drivers to see.
Colour does the first sorting here. Green and blue lamp symbols confirm a setting you chose, while the red triangle is the one that flashes. Read the behaviour next: a steady icon is status, a flashing circuit is a warning to others, and a symbol that never appears at all may mean nothing is switched on.
Headlamp Symbols and the Dark Rear End
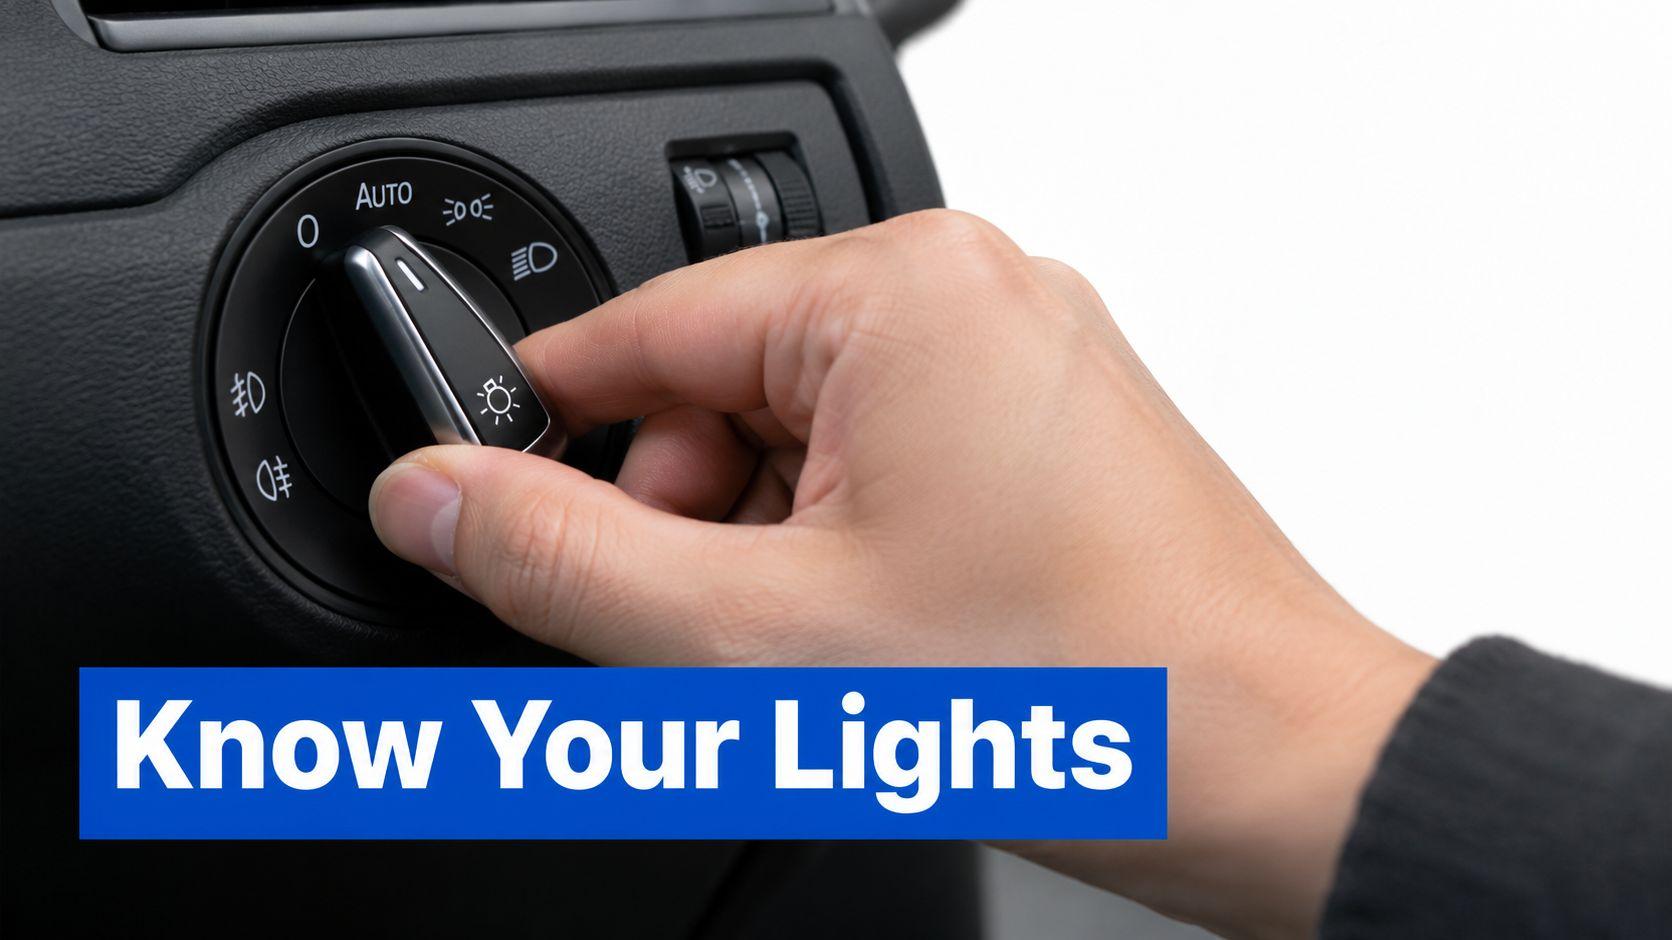
A green headlamp symbol with lines angled down means low beams are on. A blue headlamp symbol with straight lines means high beams are on, so dip them for oncoming and preceding traffic. An AUTO headlamp indicator means the system is set to switch lights on automatically, but only while the control remains in that automatic position.
Modern vehicles can illuminate the instrument panel while leaving rear lights off, and Transport Canada's vehicle lighting guidance warns that daytime running lights are insufficient for darkness or bad weather and notes that since September 2021 Canada's rules have required newer vehicles to use systems such as automatic rear lights with daytime running lights, automatic full lighting in darkness, or a dashboard that stays dark to prompt the driver. Drivers still have to select the correct setting, because automatic headlights may work only when the control is set to automatic.
The control in the photo below is the one to learn by touch and position, not by dashboard brightness alone.
Use a three-step routine:
- Look for the green headlamp icon: Confirm low beams, not just daytime running lights, are selected.
- Confirm rear lights are lit: Check reflections on a garage door, window, or the vehicle behind you while parked.
- Switch to low beams deliberately: Do it in rain, snow, fog, and at dusk, even if you can still see the road ahead. Other drivers need to see you.
Ontario learners studying lighting rules should also understand the related topic in the guide to parking lights on a car and when drivers use them, because parking lights, daytime running lights, and low beams are three different settings with different rear-light behaviour.
Hazards and Fog Lamps
The hazard symbol is a red triangle, usually on a button rather than only in the cluster. It activates the four-way flashers, which makes it the one lighting symbol whose whole job is to flash. Use it when you're stopped in a hazardous place or need to warn others of a danger ahead. Many flashing lamp colours are restricted on public roads, so don't fit aftermarket flashing lights and assume they're legal.
The fog lamp symbol looks like a headlamp with wavy lines and is usually green for front fog lamps on many vehicles. It's a separate control from the hazard triangle and from high beams. Use fog lamps to improve near-road visibility in fog or heavy precipitation, then turn them off when conditions clear so you don't dazzle other drivers.
For the G1 topic on lighting and visibility, the testable point is timing. Lights aren't only for full darkness. If weather or dusk makes your vehicle hard to see, low beams and taillights need to be on before other drivers have trouble judging your position.
How to Check Warning Symbols at Startup and While Driving
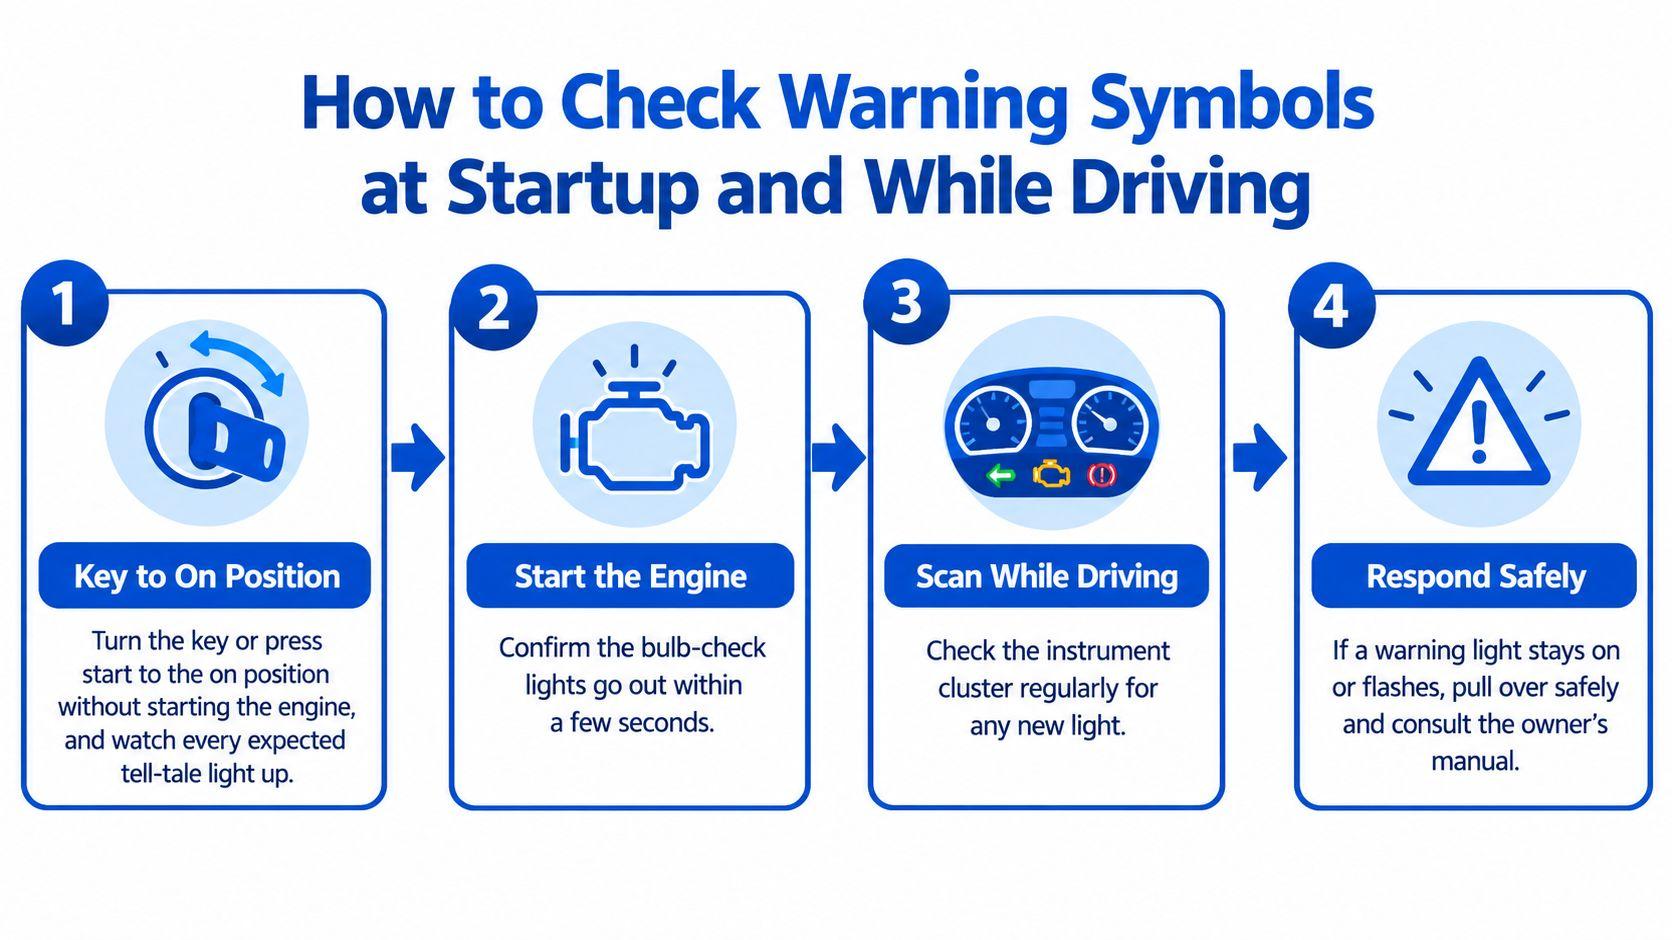
A warning symbol in car clusters is easiest to read when you check it the same way every time. This sequence takes under a minute, and it separates a normal bulb check from a warning that needs action.
The Eight-Step Check
- Turn to on without starting: Turn the key or press start to the on position without starting the engine, and watch every expected tell-tale light up. This proves the bulbs or display segments work.
- Start the engine: Confirm the bulb-check lights go out within a few seconds. A light that never appears at this stage may not be able to warn you later.
- Note anything that stays on: Record its colour, shape, and pattern before you move. Steady and flashing lead to different actions.
- Check the manual legend: Look up the symbol while parked. The legend overrides general charts and memory from a previous car.
- Watch the first minute of driving: Scan the panel as you drive off. A light that stays on after moving away may indicate a serious problem.
- Respond by colour: If a red light appears, pull over safely as soon as conditions allow and switch off where appropriate. If an amber light appears, drive gently to a service point and book a diagnosis.
- Write down the context: Note the symbol, time, speed, weather, and any sounds, smells, vibrations, or changes in steering and braking. A technician will ask, and details fade quickly.
- Confirm the repair worked: After service, watch the next start-up. The light should appear during the bulb check and then go out. If it returns, record when and contact the shop.
Why the Bulb Check Is Normal
At start-up, the car is proving it can warn you. Oil, battery, airbag, ABS, and check engine lights commonly appear together, which alarms new drivers who think several systems have failed at once. They haven't failed if they go out promptly after the engine starts and the self-check finishes.
A continuing light is different because the system has finished checking and still sees a condition. That's the point where colour, pattern, and the manual take over. Don't clear a light by disconnecting the battery or ignoring it until the next oil change. Clearing a warning without finding the cause also erases information a technician could have used.
The bulb check answers one question: can this warning light work? A light that stays on answers another: is it working right now because it has something to report?
Practise this sequence during supervised G1 driving until it's automatic. Say the colour out loud, name the pattern, and state the first action before you reach for the manual. That habit also prepares you for the vehicle-readiness thinking in a G driving test checklist for Ontario learners, where examiners expect smooth pre-drive checks rather than a rushed start.
Don't dim the instrument display so far at night that you can't recognise a new amber light, and don't cover part of the cluster with a phone mount or parking pass. A warning you can't see gives you no time to choose a safe place to stop. Glance at the cluster regularly while driving, especially after hitting a pothole, driving through deep water, hearing a new noise, or feeling a change in power or braking.
Decide Whether to Keep Driving or Stop
The decision is rarely about the icon alone. It's about colour first, then pattern, then how the car feels and where you are when the light appears. In Ontario, the Official MTO Driver's Handbook guidance on getting ready to drive instructs drivers to understand their vehicle's controls and instruments, verify that warning lights and gauges function properly, and watch for any warning light that stays on after driving away. A red light that remains illuminated after the vehicle starts moving may indicate a serious mechanical or safety problem, so it isn't a routine reminder.
Driving Decision by Warning Situation
Situation Colour Action Timing Red warning stays on after driving away Red Pull over safely, check the owner's manual, and call for help if unsure Now Brake warning with a soft or spongy pedal Red Stop, do not continue, and arrange a tow Now Engine temperature needle or light rising Red Stop, switch off, and wait for the engine to cool before checking coolant Now Oil pressure light while driving Red Stop, switch off, and check the oil level Now Check engine light flashing Amber, flashing Reduce speed and load, then stop when safe Now Check engine light steady, car drives normally Amber Book a diagnostic scan Within a few days Tyre pressure light after a cold snap Amber Check and inflate all four tyres when cold Same day Light appears only at start-up and goes out in seconds Any Normal bulb check, no action None
This table gives the decision and timing, not the underlying causes. Notice how it reads: colour sets the default urgency, then behaviour adjusts it. A steady amber and a flashing amber are the same colour but different decisions. A light of any colour that appears only at start-up and goes out is no decision at all. Use this table when you're deciding whether the trip continues, and use the family sections when you're parked and need to understand what a specific system may be reporting.
Timing, Place, and Supervised Driving
Place changes urgency. An amber light that appears in a parking lot lets you cancel the trip calmly and read the manual. The same light during a long highway run may call for the next exit, a service centre, or a call for advice before you cover another hundred kilometres. Weather matters too. Loss of ABS help on a dry street is serious. Loss of ABS help on an icy descent demands slower speeds and much more space right away.
Keep the check engine rule consistent. Flashing means reduce speed and load and stop when safe. Steady with normal driving feel means book a scan within a few days, and you don't need to stop on the shoulder for that alone. Don't let a passenger, a forum post, or a previous car talk you into a different answer for the same pattern.
If a light appears while a G1 learner is supervised, the learner tells the supervising driver at once. The supervising driver decides whether to stop, where to stop, and whether the learner or the supervisor handles the next move. That conversation is training, not failure. It teaches the learner to report a warning early instead of hiding it to avoid interrupting the drive.
Learners can pair that road habit with related sign and signal study, including the guide to turn signals and vehicle lights in Ontario, because dashboard indicators and exterior signals are both ways a vehicle communicates. For structured revision, G1ready.ca offers free practice tests and explanations covering vehicle knowledge alongside road signs, which learners can use as one study option before the G1 test.
When you're unsure, choose the action that preserves options. Slowing down, stopping in a safe place, and reading the manual rarely make a mechanical problem worse. Continuing at highway speed with a red oil, temperature, brake, or charging warning can remove the option to repair the car at reasonable cost, or to stop it under control at all.
Practise naming these symbols by colour, pattern, and first action until you can do it without hesitating, then test that knowledge alongside road signs, lighting rules, and pre-drive checks at G1ready.ca. Use the free practice tests and explanations to find weak areas before test day, so a dashboard question or a real warning light during supervised driving gets a calm, correct response.