
You're approaching an intersection when a yellow light appears, or driving toward a yellow diamond sign that seems to show a curve ahead. You have only a moment to decide what the colour and shape are telling you. For a new Ontario driver, that quick recognition can make the difference between a calm, safe response and a rushed mistake.
Yellow road messages appear on signs, traffic lights, and pavement markings, but they don't all communicate exactly the same thing. The key is to read colour and structure together. For the Ontario G1 test, a yellow diamond usually signals advance warning, while a fluorescent yellow-green five-sided sign identifies a school zone and an orange sign points to a temporary condition.
Why Yellow Signs Matter for Ontario Drivers
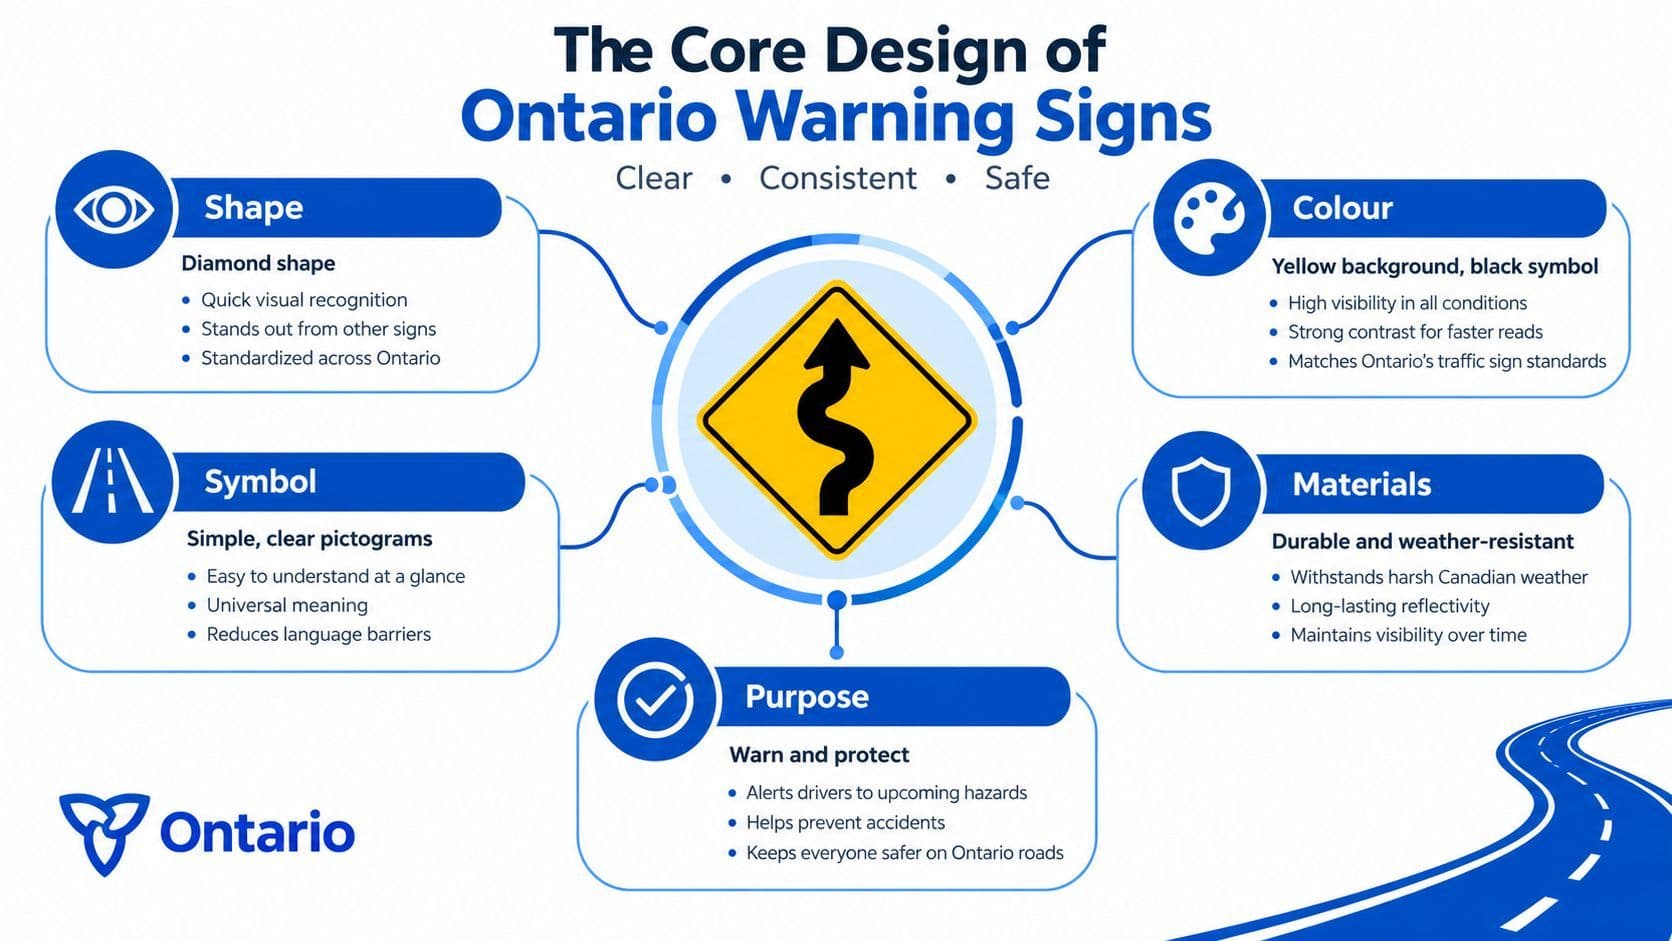
Ontario's official driving handbook says warning signs are usually diamond-shaped, with a yellow background and black letters or symbols. They warn drivers about dangerous or unusual conditions ahead, including curves, turns, dips, and sideroads. You can review these examples in the Ontario Driver's Handbook sign guide.
Suppose you see a yellow diamond with a black curve symbol. It isn't telling you to make a turn immediately, and it isn't giving you a destination. It is giving you time to prepare for a hazard ahead. You may need to reduce speed, check your surroundings, or position the vehicle safely before reaching the condition shown on the sign.
Practical rule: Yellow usually means “pay attention to what's ahead,” not “perform this command now.”
That distinction matters on the G1 test. Regulatory signs generally communicate rules or prohibitions, while guide signs help with route-finding. A standard yellow warning sign belongs to neither group. Its job is to alert you so you can adjust your driving before the hazard arrives.
Read the sign as a complete message
New learners sometimes focus only on the background colour and ignore the shape or symbol. That approach can lead to confusion because Ontario also uses fluorescent yellow-green signs for school areas and orange signs for temporary conditions.
Use this quick sequence:
- Start with the background: Yellow suggests a permanent warning, fluorescent yellow-green points to a school-area alert, and orange indicates a temporary warning.
- Check the shape: A standard warning sign is usually a diamond, while a school zone sign is five-sided.
- Read the symbol: The symbol identifies the specific hazard, such as a curve, dip, or sideroad.
Yellow is therefore a visual safety cue built into Ontario's road system. Once you recognise the category before studying the symbol, you'll have a better chance of reacting correctly both on the test and behind the wheel.
The Core Design of Ontario Warning Signs
Ontario's warning signs follow a consistent visual system. The Ontario Traffic Manual Book 1B explicitly lists warning signs as Yellow with black messages and borders, within a codified design structure established since at least the early 2000s.
Use three visual clues
1. Shape comes first. The familiar diamond shape tells you that the sign is warning about a road condition. If a test question describes a yellow sign turned on its side, think warning, not regulation or directions.
2. Colour confirms the category. The yellow background creates a strong contrast with the black border and message. The colour isn't decorative. It helps drivers identify the sign's purpose before they can fully read the symbol.
3. The symbol supplies the detail. A diamond sign may warn of a curve, turn, dip, or sideroad. The shape and colour establish the broad category, while the black symbol tells you what kind of condition to expect.
This layered design helps in situations where a sign is partly obscured, seen from a distance, or described in words rather than shown as a picture. On a G1 question, don't jump straight to the symbol. First ask, “What sign family does this shape and colour belong to?”
Turn recognition into a test habit
When studying, cover the symbol and identify the category from the outline and background. Then reveal the symbol and name the hazard. You can reinforce the distinction by reviewing Ontario's information signs and their meanings, while keeping the central rule clear: a standard yellow diamond is an advance warning.
A useful memory phrase is “yellow diamond, hazard ahead.” It reminds you that the sign gives advance information. It doesn't itself impose a manoeuvre such as stopping, yielding, or following a particular route.
Standard Warnings Versus School Zone Alerts
A standard yellow warning sign and a school zone sign may both attract attention, but their visual identities are different. The standard warning sign is usually a yellow diamond. The school zone sign is five-sided, with a fluorescent yellow/green background and black symbols.
The Ontario Driver's Handbook says the school zone sign warns that you're entering a school zone. It tells drivers to slow down, drive with extra caution, and watch for children, as described in the official school zone sign information.
The shape is the fastest way to separate them. A diamond tells you to expect a general road hazard. A five-sided sign tells you that the location is connected to a school zone and requires special attention to children and activity around the roadway.
Compare the visual cues
Feature Standard Warning Sign School Zone Sign Shape Usually diamond-shaped Five-sided Background Yellow Fluorescent yellow/green Message colour Black letters or symbols Black symbols Main purpose Warns of dangerous or unusual road conditions ahead Identifies entry into a school zone Driver response Prepare for the hazard shown Slow down, use extra caution, and watch for children
The fluorescent shade is important. It is not just a brighter version of ordinary yellow in a test question. Ontario uses it as part of a distinct school-area sign category. If the answer choices include “yellow diamond” and “five-sided fluorescent yellow/green,” those descriptions point to different meanings.
Avoid the school-zone trap
A question may ask which sign warns you that you're entering a school zone. Choosing “yellow diamond” would miss the structural clue. The correct mental process is:
- Identify the sign's outline.
- Notice whether the background is ordinary yellow or fluorescent yellow/green.
- Connect the five-sided fluorescent sign with children and school-zone caution.
The two signs also prompt different expectations. A curve warning tells you to prepare for the road geometry shown. A school zone alert tells you to look for children and drive with extra caution in that location. Both require attention, but the symbol, shape, and setting refine the response.
Yellow Lights and Pavement Markings Explained
Yellow doesn't only appear on roadside signs. Ontario also uses it at intersections and on the road surface, but the meaning depends on where you see it. A traffic light, for example, communicates a change in permission, while a pavement marking separates traffic flows.
An amber or yellow traffic light means the red light is about to appear. Ontario's handbook says you must stop if you can do so safely. If stopping safely isn't possible, you may proceed with caution. A flashing yellow light has a different instruction: approach and move through the intersection with caution. The rules are set out in the Ontario traffic lights guidance.
Treat yellow as a transition
A steady yellow light isn't an invitation to accelerate through the intersection. It marks a transition from normal movement toward stopping. Your decision depends on whether you can stop safely, not on whether you can beat the red light.
A flashing yellow light also requires caution, but it doesn't carry the same meaning as a steady yellow light. Read the signal's behaviour as well as its colour:
- Steady yellow: Stop if you can do so safely. Otherwise, proceed with caution.
- Flashing yellow: Approach and move through the intersection with caution.
The colour connects these situations through heightened awareness, but the exact signal determines your action.
Look down at the pavement
Ontario's official handbook states that yellow pavement markings separate traffic travelling in opposite directions, while white pavement markings separate traffic travelling in the same direction. The distinction is explained in the Ontario pavement markings guide.
If you see a yellow centre line, expect traffic on the other side to be travelling toward you. White markings, by contrast, organise lanes moving in the same direction. This is a common G1 misconception because learners sometimes treat every painted line as a lane divider with the same meaning.
Yellow on the pavement separates opposing traffic. White separates same-direction traffic.
Learning the colour system as a connected set makes recall easier. Yellow on a sign warns of a condition ahead, yellow at a light signals a transition requiring a safe decision, and yellow on the pavement separates traffic moving in opposite directions.
Temporary Conditions and Common G1 Test Traps
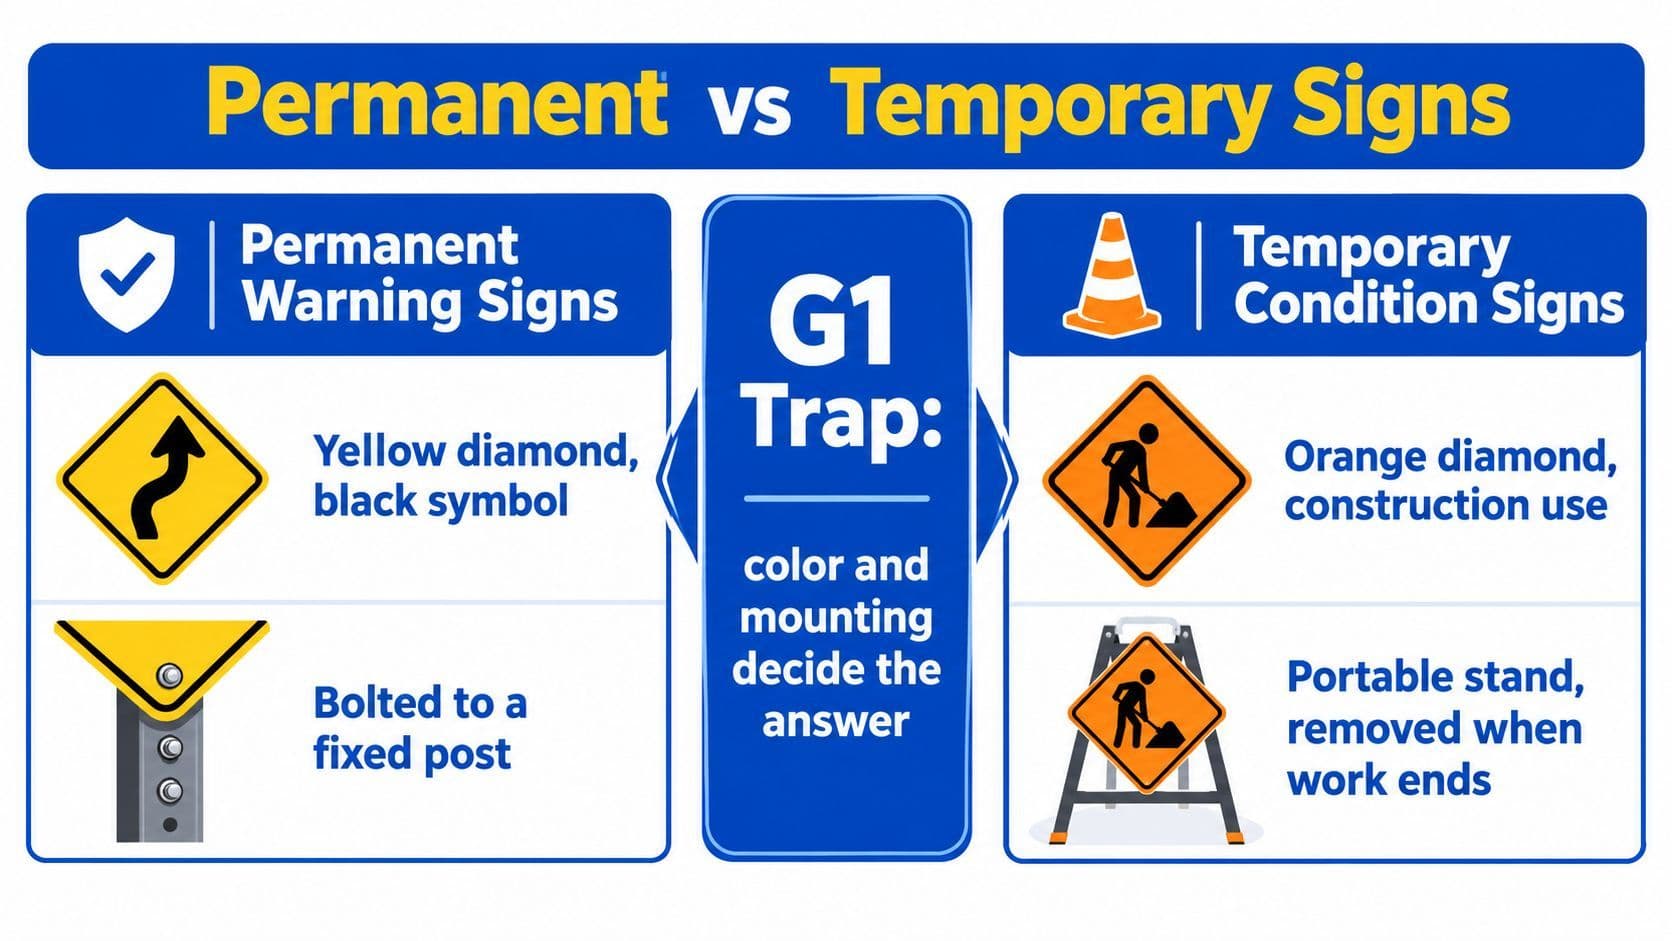
A yellow diamond doesn't cover every warning situation. The Ontario Traffic Manual distinguishes permanent warning signs, which use a yellow background with a black message, from temporary warning signs, which use orange instead of yellow to signal that the condition is temporary. The distinction appears in the Ontario Traffic Manual warning-sign standards.
Don't confuse colour families
A temporary orange diamond may have a familiar warning-sign shape, but orange changes the category. It tells you that the road condition is associated with temporary work or another short-term traffic situation. The sign may be portable rather than attached to a permanent roadside post.
That makes colour the first clue, not the only clue. A G1 question can describe a diamond shape and then ask whether the sign warns about a permanent hazard or a temporary condition. Look for the background colour before choosing an answer.
G1 test shortcut: Yellow means a standard warning. Orange means the warning relates to a temporary condition.
Watch for these misleading answers
- “Every diamond sign is yellow.” False. Temporary warning signs use orange instead of yellow.
- “A yellow sign gives a mandatory command.” Usually false for standard warning signs. They alert you to a condition ahead.
- “A school zone sign is an ordinary yellow diamond.” False. The school-zone format is five-sided with a fluorescent yellow/green background.
- “Yellow lines separate traffic moving in the same direction.” False in Ontario. Yellow markings separate opposing traffic, while white markings separate traffic moving in the same direction.
Red also has a defined place in Ontario's sign system. The Traffic Manual distinguishes warning signs from regulatory signs, with red reserved for major regulatory exceptions such as STOP and YIELD. Don't use “red means danger” as a substitute for identifying the sign's purpose. Shape, colour, and message work together.
For a compact review of these distinctions, use the Ontario road signs test guide and practise explaining each answer aloud. If you can state why an option is wrong, you're less likely to fall for a colour or shape trap.
Building Confidence Through Targeted Practice
Reading the handbook gives you the rules, but recognition improves when you repeatedly apply them. Yellow signs are especially suitable for targeted practice because the questions often test a combination of colour, shape, and driver response rather than a single definition.
Start with the three categories that cause the most confusion:
- Standard yellow warning signs: Usually diamond-shaped, with black symbols or letters, and used to warn about dangerous or unusual conditions ahead.
- Fluorescent yellow-green school zone signs: Five-sided, with black symbols, and used to identify a school zone where you must slow down, use extra caution, and watch for children.
- Orange temporary warning signs: Used to identify temporary conditions rather than ordinary permanent hazards.
Practise recognition before memorisation
When a question appears, pause before reading every answer choice. Identify the background colour and shape first. Then ask what action the sign's category requires.
For example, a yellow diamond with a curve symbol should trigger “hazard ahead.” A five-sided fluorescent yellow-green sign should trigger “school zone.” An orange diamond should trigger “temporary condition.” This approach reduces the chance that a familiar shape will pull you toward the wrong answer.
A useful study routine includes:
- Targeted quizzes: Practise warning signs, school zones, traffic lights, and pavement markings separately.
- Mistake notes: Write the visual clue you missed, such as “five-sided, not diamond.”
- Mixed review: Combine sign categories after studying them individually so you practise switching between meanings.
- Retesting: Return to missed questions until the distinction feels immediate rather than calculated.
A diagnostic test can show whether your errors come from sign recognition or from the required driver response. If you know that orange means temporary but still choose an answer about a permanent hazard, review the wording. If you confuse yellow and white pavement markings, revisit the direction of traffic each colour separates.
The Ontario G1 practice test resources can fit into that process with focused practice and explanations for correcting mistakes. The aim isn't to memorise isolated pictures. It's to build a reliable sequence: colour, shape, symbol, then action.
Practise until you can distinguish a yellow warning diamond, a fluorescent yellow-green school-zone sign, and an orange temporary sign without hesitation. On test day, that visual sequence will help you choose the answer that matches Ontario's road-sign system.
G1ready.ca offers free, registration-free practice exams, targeted quizzes, diagnostic testing, explanations, hints, and progress tracking for Ontario G1 preparation. Use it to practise the colour-and-shape distinctions covered here, then visit G1ready.ca to build a focused study routine before your test.


