
You're driving along a quiet Ontario road on a foggy morning. Your headlights catch a yellow diamond through the trees, and inside it sits a small black stop-sign symbol. You haven't reached the intersection yet, but the road is already telling you to prepare.
That sign is Stop Sign Ahead. It warns you that a regulatory stop sign is coming, often where the view is limited or the intersection may appear later than expected. For a G1 learner, the important skill isn't just memorising the picture. You need to recognise the sign, understand what action it requires, and distinguish the warning from the legal stop that follows.
What the Stop Sign Ahead Sign Actually Tells You
The first time you see a stop sign ahead on an unfamiliar road, you might wonder whether you should stop immediately. You shouldn't. The warning sign gives you advance notice. It isn't the command to stop.
Think of the sign as the beginning of a short chain of decisions. You see the warning, ease off the accelerator, look for the upcoming intersection, and prepare to stop smoothly. When you reach the actual red stop sign, you must bring the vehicle to a complete stop before proceeding when it's safe.
The Ontario Official Driver's Handbook explains that warning signs such as “Stop sign ahead” tell drivers to slow down. That wording matters. The yellow diamond prepares you for a hazard or traffic-control feature ahead, while the red octagonal sign creates the legal stopping requirement. You can review the handbook's treatment of warning signs in the Ontario Official Driver's Handbook sign guide.
Remember: The yellow diamond means prepare. The red octagon means stop.
Warning versus regulation
A warning sign communicates what you're approaching. A regulatory sign tells you what you must do. The stop sign ahead warning belongs to the first group, even though its symbol shows the second.
That distinction appears in G1 questions because it tests whether you understand the difference between seeing a rule ahead and being at the place where the rule applies. If a question asks what the yellow diamond requires, the answer is preparation, not an immediate stop.
As you drive past the warning, keep scanning. The actual stop sign might be beyond a curve, partly screened by vegetation, or positioned at an intersection that isn't obvious from the approach. Ontario guidance treats the warning as a distinct advance cue, especially where the stop sign isn't clearly visible within the available stopping sight distance.
The rest of the skill follows naturally: recognise the design, understand why Ontario places it where it does, respond early, and connect those details to the way the G1 test asks about road signs.
Recognizing the Symbol, Shape, and Colour
Start with the sign's outline. The warning is an upright square turned on its point, creating a four-sided diamond. Ontario uses this diamond format for warning signs, so its shape tells you to expect information about a condition ahead rather than an immediate traffic command.
Inside the diamond is a black stop-sign pictogram. It resembles a small octagon, which connects the warning to the red regulatory stop sign you'll encounter later. The actual stop sign is a red octagon with a white border and bold white STOP lettering. The warning version changes the colour and context so you understand that the stop sign is ahead, not directly at your position.
Read the visual grammar
Use this quick comparison when studying:
- Shape: The warning is a diamond. The regulatory sign is an octagon.
- Colour: The warning uses a yellow or yellow-green field. The regulatory sign uses red.
- Symbol: The warning contains a black miniature stop-sign image. The regulatory sign contains the word STOP in white.
- Meaning: The warning says prepare for a stop ahead. The regulatory sign requires a complete stop.
The colour shift is deliberate. Yellow tells you to pay attention and adjust your driving. Red signals a direct traffic-control instruction. That's why a yellow diamond with a stop symbol shouldn't be confused with the stop sign itself.
Separate it from similar warnings
A yield ahead sign also warns you about a traffic-control sign, but its inner symbol is different. It points to a yield sign, not an octagon. A signal ahead sign uses traffic-light imagery. Neither has the central black octagonal stop pictogram.
You don't need to identify every detail from far away. Look for the combination: diamond outline, yellow background, black stop-sign symbol, and the indication that a stop is ahead. The Ontario road-sign information guide can help you practise grouping signs by shape, colour, and purpose.
On the G1 test, a question may show only a simplified illustration. If you recognise the diamond first, then notice the miniature octagon, you can usually eliminate signs for curves, traffic signals, railway crossings, or pedestrian activity.
Where Ontario Places the Sign and Why
Ontario classifies the stop sign ahead warning as Wb-1. Its design follows listed standards rather than local guesswork. The Ontario Traffic Manual sign and signal display index shows standard sizes of 75 x 75, 90 x 90, and 120 x 120. The size selected depends on the road and the amount of notice drivers need.
Placement depends mainly on sight distance. For low-speed applications, Ontario guidance places the warning roughly before the stop line, giving drivers time to notice the sign, identify its message, and prepare for the controlled intersection. It is used when the actual STOP sign cannot be seen clearly on approach, including situations involving bends, crests, foliage, parked vehicles, or other restricted views. The Ontario warning-sign guidance for STOP AHEAD explains these use and placement principles.
A warning sign works like an advance notice from an instructor. It appears before the decision point, so the driver has time to understand what is coming instead of reacting at the last moment. A sign hidden behind trees or placed where a bend blocks it cannot provide that useful notice.
The standard-size Wb-1 warns of a standard-size STOP sign where the posted speed is 60 km/h or less. Ontario guidance also permits oversize versions and additional roadway legends when the location needs greater conspicuity. On a faster or more complicated route, engineers may place the warning farther from the intersection to provide more time for perception and braking.
For the G1 test, connect the sign's code, size, and setting. Wb-1 identifies the warning sign, while the 60 km/h or less threshold relates to the standard-size application. Restricted sight lines explain why the sign is needed, not a change to the stop requirement itself.
The exam-friendly idea is simple: placement gives drivers time to see, process, and respond. The warning does not replace the regulatory STOP sign. It prepares you to reach that sign with enough control to make the required complete stop.
How Drivers Should Respond on the Road
Seeing the sign should change your driving before you reach the intersection. You don't need to brake sharply, but you do need to stop treating the road ahead as an uninterrupted stretch.
Use this sequence:
- Ease off the accelerator early. Let the vehicle begin losing speed smoothly.
- Scan for the intersection. Look beyond the warning for the actual stop sign, cross street, pedestrians, and other vehicles.
- Check mirrors and surroundings. A vehicle behind you may need notice that you're slowing.
- Cover the brake and prepare to stop. Be ready to make a controlled stop at the line.
The warning itself doesn't require you to stop at its post. It tells you to manage your approach so that you can stop at the actual stop line. Once you reach the regulatory sign, stop completely. Check for pedestrians, cyclists, and cross traffic, then proceed only when the intersection is safe and you have the right of way.
What poor timing looks like
A driver who ignores the warning may reach the actual stop sign at an uncomfortable speed. That can lead to harsh braking, a late stop, or a rolling stop. In Ontario, failing to make a complete stop can lead to demerit points and fines, so “almost stopped” isn't a safe or legal substitute.
New drivers sometimes look only at the road directly in front of the vehicle. The stop sign ahead warning encourages a wider scan. Look through the windshield toward the road's vanishing point, use the mirrors, and identify where the intersection will require the vehicle to stop.
For more practice with what happens after the stop, review these Ontario G1 right-of-way rules. The warning helps you arrive prepared, but it doesn't decide who proceeds first once you've stopped.
You can also watch the following visual walkthrough as a reminder of the approach sequence:
Why the Sign Exists and Whether It Reduces Crashes
A driver rounds a curve and sees the stop sign later than expected. The stop sign ahead warning is intended for situations like this. It gives drivers time to recognize that a regulatory stop is coming when the sign itself may be hard to see because of a curve, obstruction, or road layout.
Ontario and Canadian traffic-control guidance treats this sign as a targeted response to limited sight distance. Research reports up to a 35% reduction in related collisions in some stop-control enhancement treatments, as described in the Canadian research on enhancing stop control at rural highway intersections. That result applies to certain treatments and locations. It does not mean every installation produces the same reduction.
Targeted warning works better
A warning sign has more value when it marks a real problem. If drivers see a stop-ahead sign at every stop-controlled intersection, the message may lose force. Canadian engineering literature discusses how widespread installation can dilute its effect.
Ontario's placement approach follows the same logic. Authorities use the sign where a driver may not see the stop sign soon enough, such as before a curve, near an obstruction, or along an approach with restricted visibility. The sign is therefore a response to a specific sight-line issue, not a standard decoration at every intersection.
Condition Reported Collision Reduction Source Basis Some stop-control enhancement treatments Up to 35% in related collisions Canadian traffic-control research, see citation above
The practical lesson is straightforward. A warning can reduce risk when it appears where drivers need extra time and can read it clearly. Its presence does not replace careful road design or attentive driving. Authorities must choose the location carefully, and drivers must still slow, identify the actual stop, and follow the regulatory sign.
How the Sign Shows Up on the G1 Test
The stop sign ahead sign belongs to the warning-sign portion of Ontario road-sign knowledge. On a multiple-choice G1 test, the question usually checks whether you can connect the picture with its meaning.
You may see questions asking:
- What does this sign warn you about?
- What shape is used for this warning sign?
- What should you do after seeing it?
- Does this sign require an immediate stop?
- Where would this sign appear in relation to the upcoming stop?
- Which sign uses a yellow diamond and a black stop symbol?
The correct reasoning follows the same order each time. Identify the yellow diamond, notice the black octagonal stop pictogram, and interpret the sign as advance warning. Then choose the answer that describes slowing and preparing for the actual stop.
Why examiners use this sign
A learner who confuses the warning with the regulatory sign may stop at the wrong place or fail to stop at the right one. The G1 test uses this distinction because it represents a foundational driving skill. You must know not just what a sign looks like, but when its instruction applies.
The Ontario road signs guide for the G1 test is useful for practising these visual comparisons. Focus on recognition rather than obscure trivia. The sign's diamond shape, warning colour, stop symbol, and preparation message carry most of the meaning you'll need.
If a question asks what action is required, avoid answers that say “stop immediately at the warning sign.” That confuses the advance notice with the actual traffic-control sign. Choose the response that tells you to slow down, look ahead, and prepare to stop at the upcoming stop line.
If a question asks about placement, connect the answer to visibility and speed. Ontario's low-speed guidance uses about 30 metres before the stop line, while higher-speed or difficult approaches require enough distance for drivers to perceive and respond safely.
Quick Recognition Checklist and Common Questions
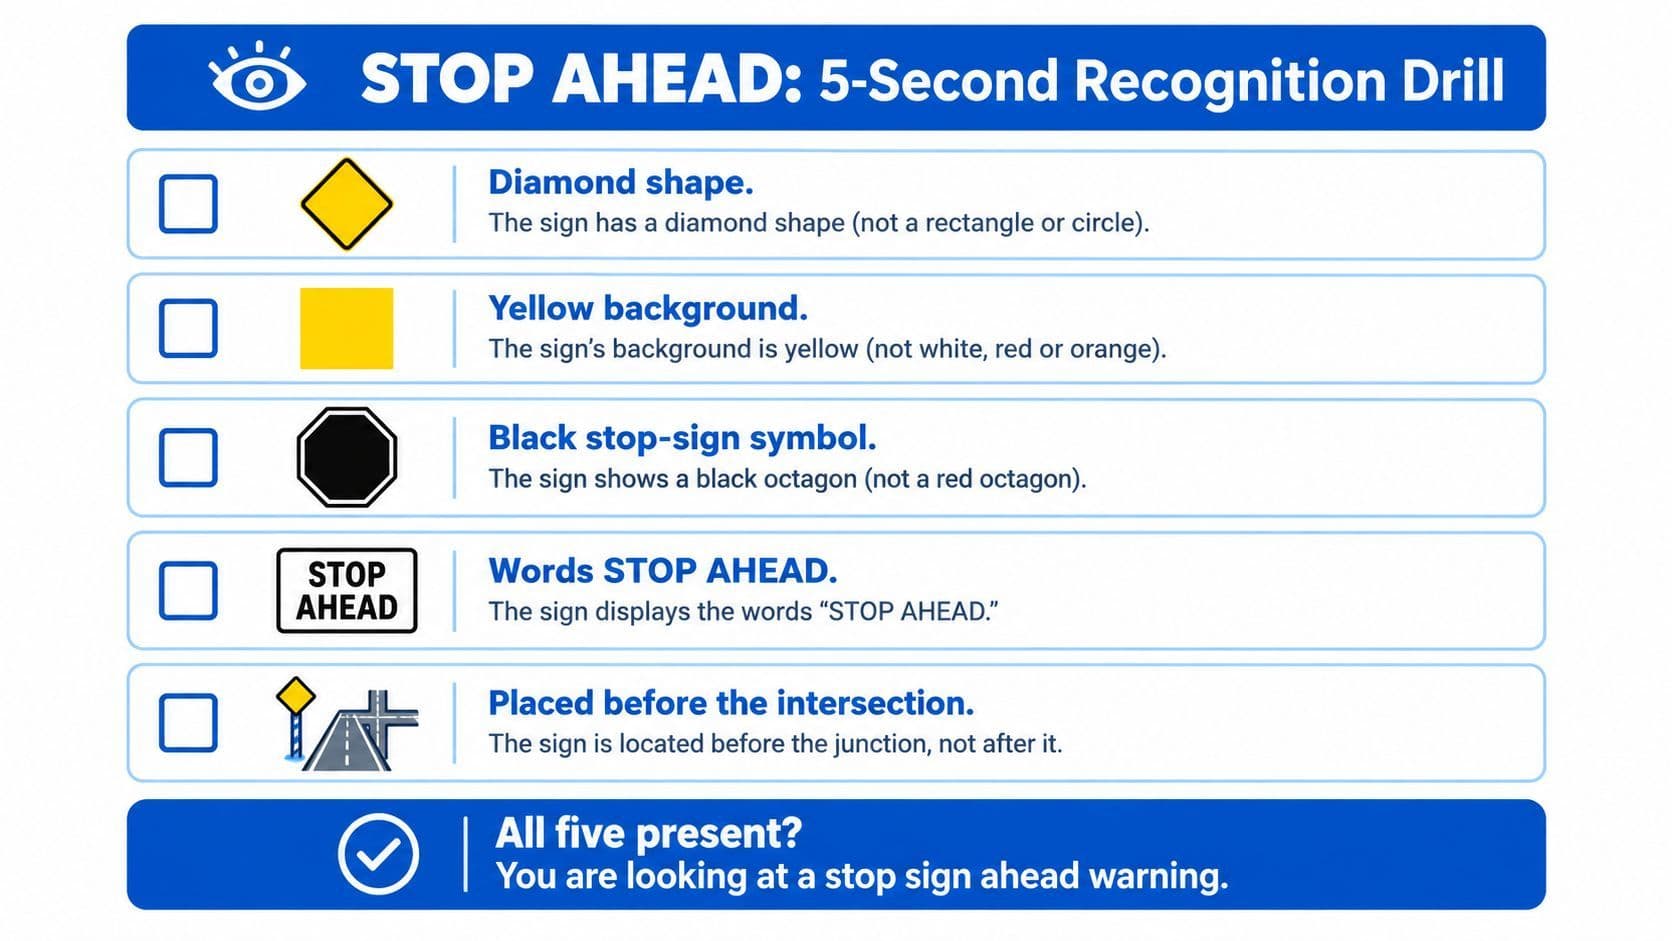
At the testing centre, use a five-clue drill. Read the sign from its appearance to its meaning, then connect that meaning to the action the question expects.
- Diamond shape. This identifies a warning sign, not the regulatory stop sign.
- Yellow background. The colour signals that you should pay attention and prepare.
- Black stop-sign pictogram. The small octagon shows that traffic control is ahead.
- STOP AHEAD meaning. You will reach the stop farther along the road.
- Placement before the intersection. The warning gives you time to adjust before the actual stop.
Two questions learners often ask
Does the stop sign ahead warning require a stop?
No stop occurs at the warning sign. Slow down, scan for the intersection, and prepare to stop. Make the complete stop at the red octagonal sign and its stop line.
How far in advance does it appear?
As noted in Where Ontario Places the Sign and Why, low-speed guidance is about 30 metres, with greater distance for higher speeds or limited sight lines. Ontario's warning-sign guidance places the focus on giving drivers enough time to see the sign, respond, and reach the stop under control.
Use this answer chain on the G1 test: yellow diamond, black stop symbol, warning ahead, slow and scan, then stop at the red octagon. That sequence separates the advance warning from the rule that applies at the intersection.
The same drill works behind the wheel. Recognize the sign, ease off the accelerator, check for the stop, and arrive with enough control to stop before proceeding safely.
Use G1ready.ca to practise Ontario road-sign questions, including stop-sign recognition and the rule requiring a complete stop before proceeding. Its quizzes, mixed tests, feedback, hints, and explanations can help identify weak areas before test day.


