If you're reading this a few days before your Ontario M road test, you're probably in the same place most riders are. You can ride. You know your bike. But you're not fully sure what the examiner wants to see, what they might mark, or how obvious your safety habits need to be when someone's following behind you and scoring everything.
That gap matters. Passing the M test isn't only about being a safe rider. It's about making safe riding visible. A lot of solid riders lose marks because they ride in a way that feels natural to them but doesn't clearly show the examiner the mirror checks, shoulder checks, lane discipline, and planning that prove competence under observation.
These M road test Ontario tips are built around that idea. Ride well, yes. But also perform your safety habits clearly enough that the examiner never has to guess.
Your Path to the Full M Licence Eligibility and Booking
A lot of riders focus on drills too early and admin too late. That's backwards. If you don't know when you're eligible, what restrictions still apply to you, and how your booking choice affects your prep, you can waste weeks practising the wrong things.
Ontario's timeline for the full M licence depends on how you earned your M2. If you got your M2 through a safety course, you're eligible for the full M after 18 months. If you got your M2 through Ministry testing, you're eligible after 22 months, according to the Ottawa Safety Council's Ontario licensing summary. The same summary notes that M2 riders can't carry passengers and are restricted from highways with speed limits over 80 km/h, with listed exceptions on specific routes.
Check your eligibility before you choose a test date
Don't estimate your date from memory. Check the exact issue date tied to your M2 and count forward properly.
Use this quick order:
- Confirm how your M2 was earned so you apply the right waiting period.
- Check your licence issue date rather than relying on when you think you passed.
- Look at your current riding reality. If you've mostly ridden city streets and very little highway, don't book the earliest possible spot just because it exists.
- Choose a test window, not just a day. Weather, bike condition, and your own schedule matter.
Practical rule: Book when you're legally eligible and genuinely test-ready. Those aren't always the same date.
Some riders rush because they're tired of waiting. Others wait too long and lose momentum. The better approach is to pick a date that gives you enough time to practise the exact route conditions the test demands, especially mixed riding that includes street and highway behaviour.
Booking strategy that actually helps
Treat the booking as part of your preparation, not an afterthought. Have your licence details ready, know your eligibility date, and be realistic about location. A centre that's easier to reach isn't always the best choice if it gives you no chance to rehearse similar roads beforehand.
If you want a step-by-step look at the booking side of Ontario road tests, this guide to Ontario road test booking steps is a useful reference for the process itself.
A few practical trade-offs matter here:
- Earlier date versus better prep: An earlier test feels productive, but it's a poor choice if you still avoid highway merges or busy intersections.
- Closer centre versus familiar roads: A nearby site saves travel time, but a site near roads you've practised often can reduce stress.
- Perfect weather waiting versus consistency: Don't train only in ideal conditions. Test-day conditions are rarely perfect.
Know what your M2 restrictions mean for practice
Your restrictions shape how you prepare. If you're still on an M2, you need to practise legally and deliberately within the rules that apply to you. That means thinking ahead about where you can ride, whether your planned route includes restricted highways, and how you'll build highway confidence where permitted.
The full M road test expects an adult, road-ready riding standard. Riders who only repeat parking lot drills or short local loops usually look underprepared once the ride opens up into real traffic flow.
The Pre-Test Inspection Your Bike Gear and Paperwork
Some test days fall apart before the first turn because the rider shows up flustered, under-equipped, or missing something simple. The fix is boring but effective. Use a written checklist and do the same inspection every time.
Bring your documents, check your bike as if the test depends on it, and wear proper gear that won't create unnecessary attention or doubt. If you want a simple reminder of what official test appointments usually require on the ID side, this overview of documents commonly needed for Ontario testing is a decent prompt.
Required items for your M road test
Category Item Check Documents Motorcycle licence ☐ Documents Vehicle ownership ☐ Documents Proof of insurance ☐ Bike condition Working headlight and brake light ☐ Bike condition Horn works properly ☐ Bike condition Tyres in safe condition ☐ Bike condition Controls operate smoothly ☐ Rider gear Helmet ☐ Rider gear Jacket and sturdy pants ☐ Rider gear Gloves and over-the-ankle footwear ☐
Paperwork first
Don't bury your documents in luggage or a backpack full of random gear. Put them in one easy-to-reach folder or pouch the night before.
What works:
- Licence ready at check-in
- Ownership easy to present
- Insurance current and readable
What doesn't work is patting down every pocket while the examiner waits. That creates stress before you've even started the motorcycle.
Arrive organised enough that check-in feels routine. The calmer you are before the ride, the cleaner you ride.
Bike condition that won't raise concerns
Your motorcycle doesn't need to be fancy. It needs to be roadworthy, predictable, and free of obvious issues. Examiners notice basic condition fast. If your brake light is intermittent, your horn sounds weak, or your controls feel sticky, you're adding risk for no benefit.
Pay attention to:
- Lights: Confirm headlight, brake light, and signals work.
- Tyres: Check overall condition and obvious wear issues.
- Brakes and throttle: Make sure both feel normal and consistent.
- Mirrors: Set them before arrival, not in a panic at the curb.
I also tell riders to show up on the bike they'll test on only if they've practised enough on that exact machine. Test day isn't the moment to adapt to a different clutch feel, heavier steering, or a taller seat.
Gear that helps rather than distracts
Wear gear that lets you move freely and turn your head easily. That's especially important because your observation habits need to be visible. If your jacket collar, helmet fit, or stiff upper body makes shoulder checks awkward, fix that before test day.
Good test gear is simple. Proper helmet, proper gloves, jacket, sturdy pants, and boots that support firm footing at stops. Flashy style doesn't help. Comfort and control do.
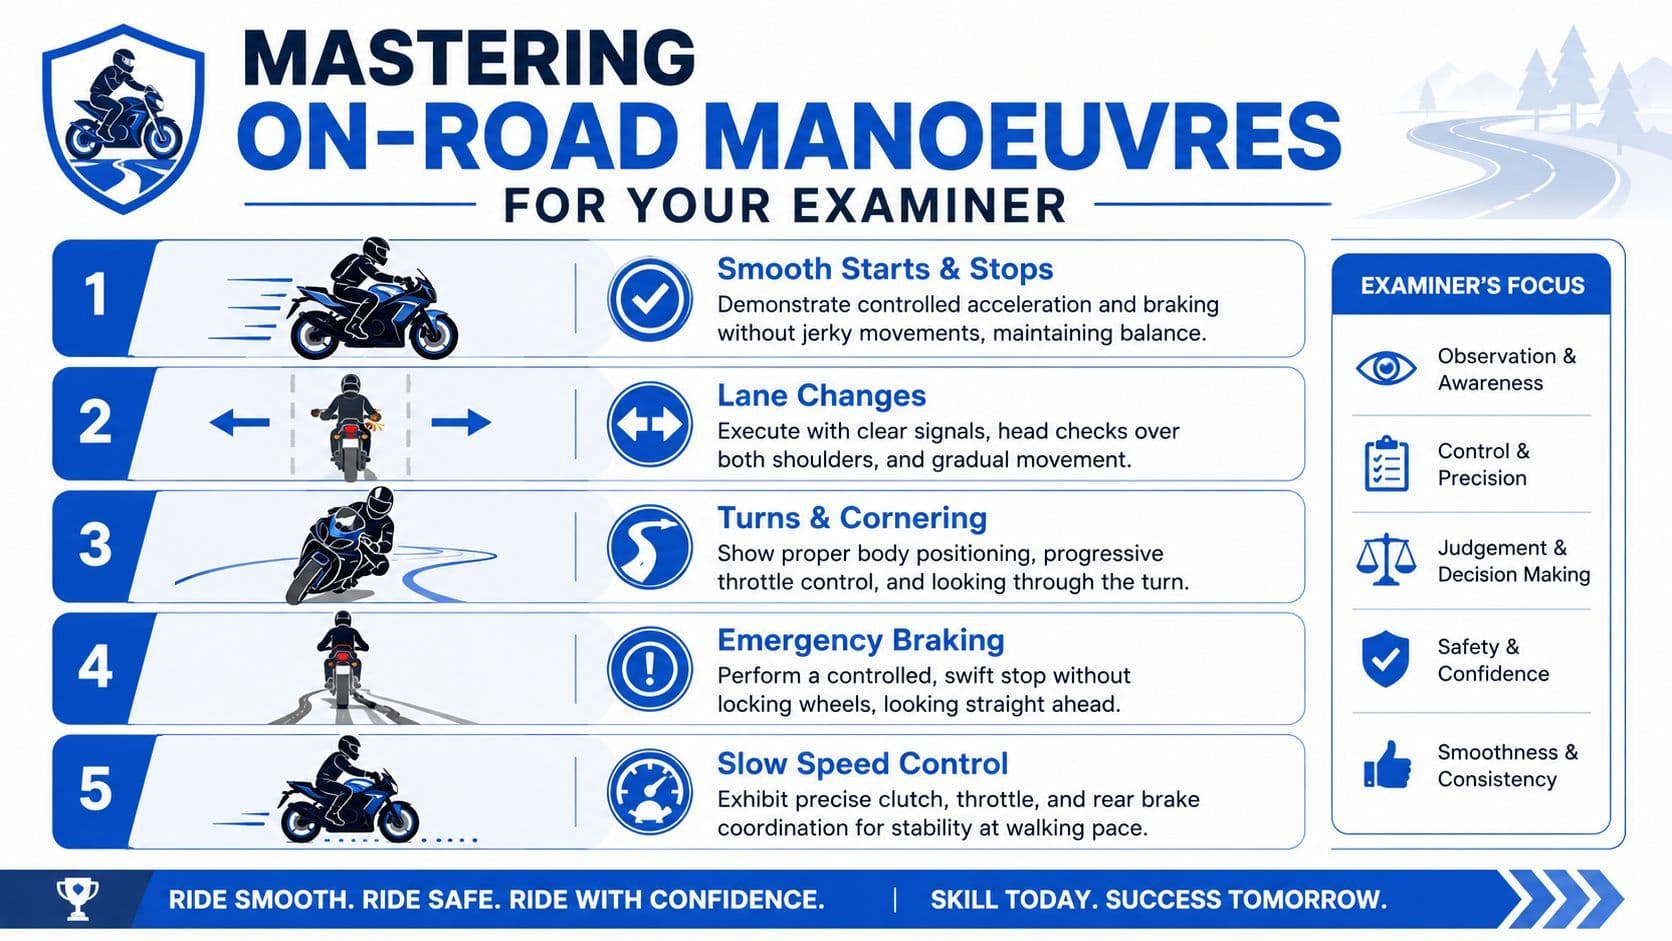
Mastering On-Road Manoeuvres for Your Examiner
The official Level Two Road Test handbook gives you the backbone of the ride. It says riders should keep a two- to three-second following distance, check mirrors before slowing, perform an over-the-shoulder blind-spot check before lane changes, keep scanning until it's safe, and keep to the centre of the lane while avoiding curbs, as set out in the Ontario Level Two road test handbook.
That tells you what to do. It doesn't always tell you how to make it obvious enough to score well. That's the key difference.
Make every check visible
A common mistake is doing safety checks too subtly. The rider knows they checked. The examiner can't confirm it.
For lane changes, don't just flick your eyes. Move your head clearly. Make the sequence readable from behind:
- Mirror check
- Clear shoulder check
- Signal if applicable
- Smooth lane movement
- Settle in lane centre
- Keep scanning
That visible sequence is one of the most important M road test Ontario tips. You're not acting for drama. You're making your awareness observable.
One good way to sharpen this is with defensive riding habits that stay consistent under pressure. This overview of Ontario defensive driving principles fits well with how riders should think during a road test.
How to handle the main scoring moments
Turns, stops, lane changes, curves, and roadside manoeuvres all reward the same thing. Deliberate control.
For turns, set your speed before the turn, choose a stable lane position, and look through the turn. Riders who rush the entry often drift wide or look stiff. The examiner reads that as poor planning.
For slowing and stopping, check mirrors before you reduce speed. Then brake progressively and finish balanced. Avoid the sloppy last-second correction that makes the stop look uncertain.
For roadside stops, leave yourself obvious time and space. The handbook states that a 150-metre gap in both directions provides enough room to complete the manoeuvre safely. That means don't force the move. Wait, assess, and then commit cleanly.
A useful visual reminder sits below.
Practice like the test not like a casual ride
Casual rides hide weak habits because you're comfortable. The test exposes them because every action is being watched.
Build practice around short, repeatable assignments such as:
- Lane-change reps: Focus only on mirror, shoulder check, move, settle.
- Intersection reps: Approach in control, scan, stop smoothly, leave cleanly.
- Roadside stop reps: Pick safe legal spots and rehearse the full observation sequence.
- Mixed-route runs: Combine neighbourhood, busier roads, and highway sections where legal and appropriate.
The rider who passes most confidently usually isn't the rider with the fanciest technique. It's the rider whose safety routine looks the same every single time.
If you want one phrase in your head for the whole test, use this: show your work.
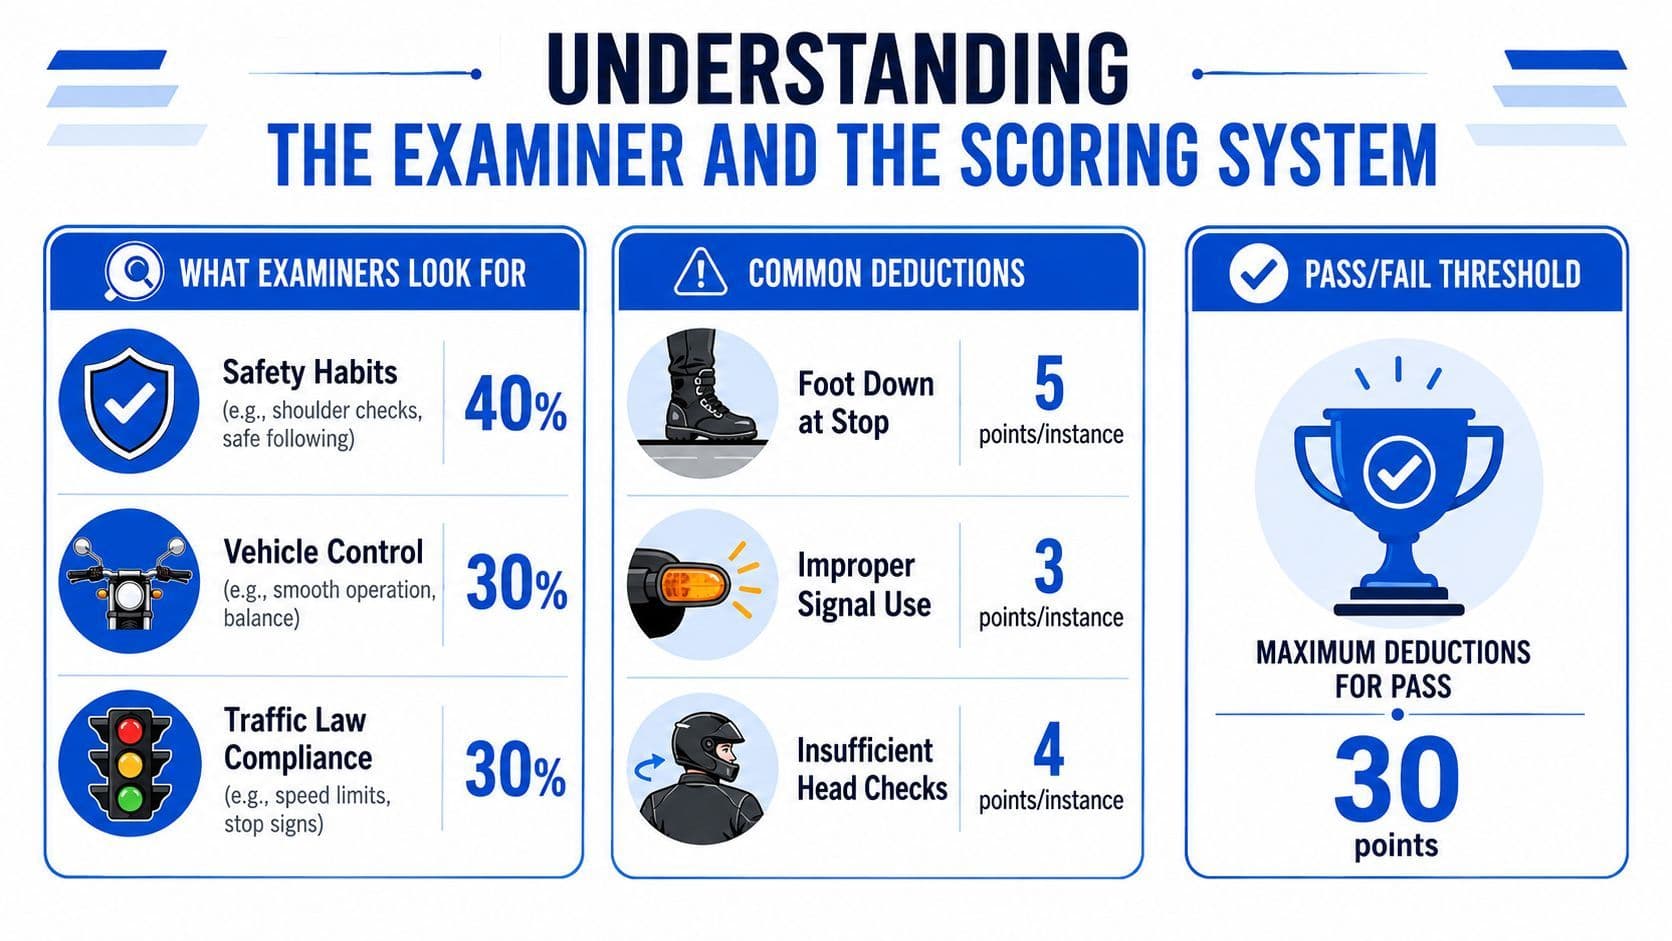
Understanding the Examiner and the Scoring System
Many riders treat the examiner like a threat. That's the wrong frame. The examiner is a trained observer following a scoring structure. If you understand that structure, the test feels less personal and much more manageable.
The Ontario Level Two motorcycle road test is a 45-minute assessment, and riders are scored on eight core criteria: turns, lane changes, business or residential riding, stopping at intersections, going through intersections, emergency stops, curves, and highways. A passing result requires staying within 26 points or fewer on a demerit-style system with a possible 400 points for errors, according to this Ontario M road test scoring overview.
What the examiner is actually doing
The examiner isn't trying to catch you out on obscure details. They're watching for patterns.
They want to see whether your riding is:
- Predictable
- Safe in traffic
- Properly observed
- Controlled under routine road demands
That changes how you should think about the ride. Instead of asking, "Did I look skilled?" ask, "Did I make my decisions easy to trust?"
The eight areas that shape your result
The eight criteria matter because they cover a full road ride, not isolated tricks. That's why someone who feels smooth in a parking lot can still struggle on the M test. The examiner is looking at how your control holds up across different environments and decisions.
A practical way to think about the categories is this:
Area What the examiner is likely noticing Turns Speed choice, line, lane discipline, observation Lane changes Timing, shoulder checks, smooth movement Business or residential riding Hazard awareness, spacing, control Stopping at intersections Planning, mirror use, balanced stop Going through intersections Scanning, right-of-way judgment Emergency stops Control and decisiveness Curves Entry speed and stable positioning Highways Merge judgment, flow, composure
What riders misunderstand about scoring
Riders often think a single small mistake means they're finished. Usually, what hurts them more is a repeated pattern. If your lane position wanders, your shoulder checks are small, and your stops vary from smooth to rushed, the examiner sees a reliability problem.
The best mindset is calm precision. Not hesitation. Not bravado.
A good test ride looks boring in the best possible way. Nothing surprises the examiner, and nothing about your riding forces them to wonder what you'll do next.
Another common misunderstanding is assuming the test rewards "confidence" in the casual sense. It doesn't. It rewards measured decisions that are legal, observable, and repeatable.
Your Test Day Game Plan From Wake-Up to Pass
The strongest test days are quiet, structured, and a little boring. That isn't accidental. Riders who do well usually remove as many decisions as possible before they leave home.
Analysis of M2 test failures from driving instructor social media says 60% of failures in the last year came from lane positioning and observation errors, especially head motions that weren't exaggerated enough for the examiner to see and confirm. Treat that as your reminder to be visible with every check.
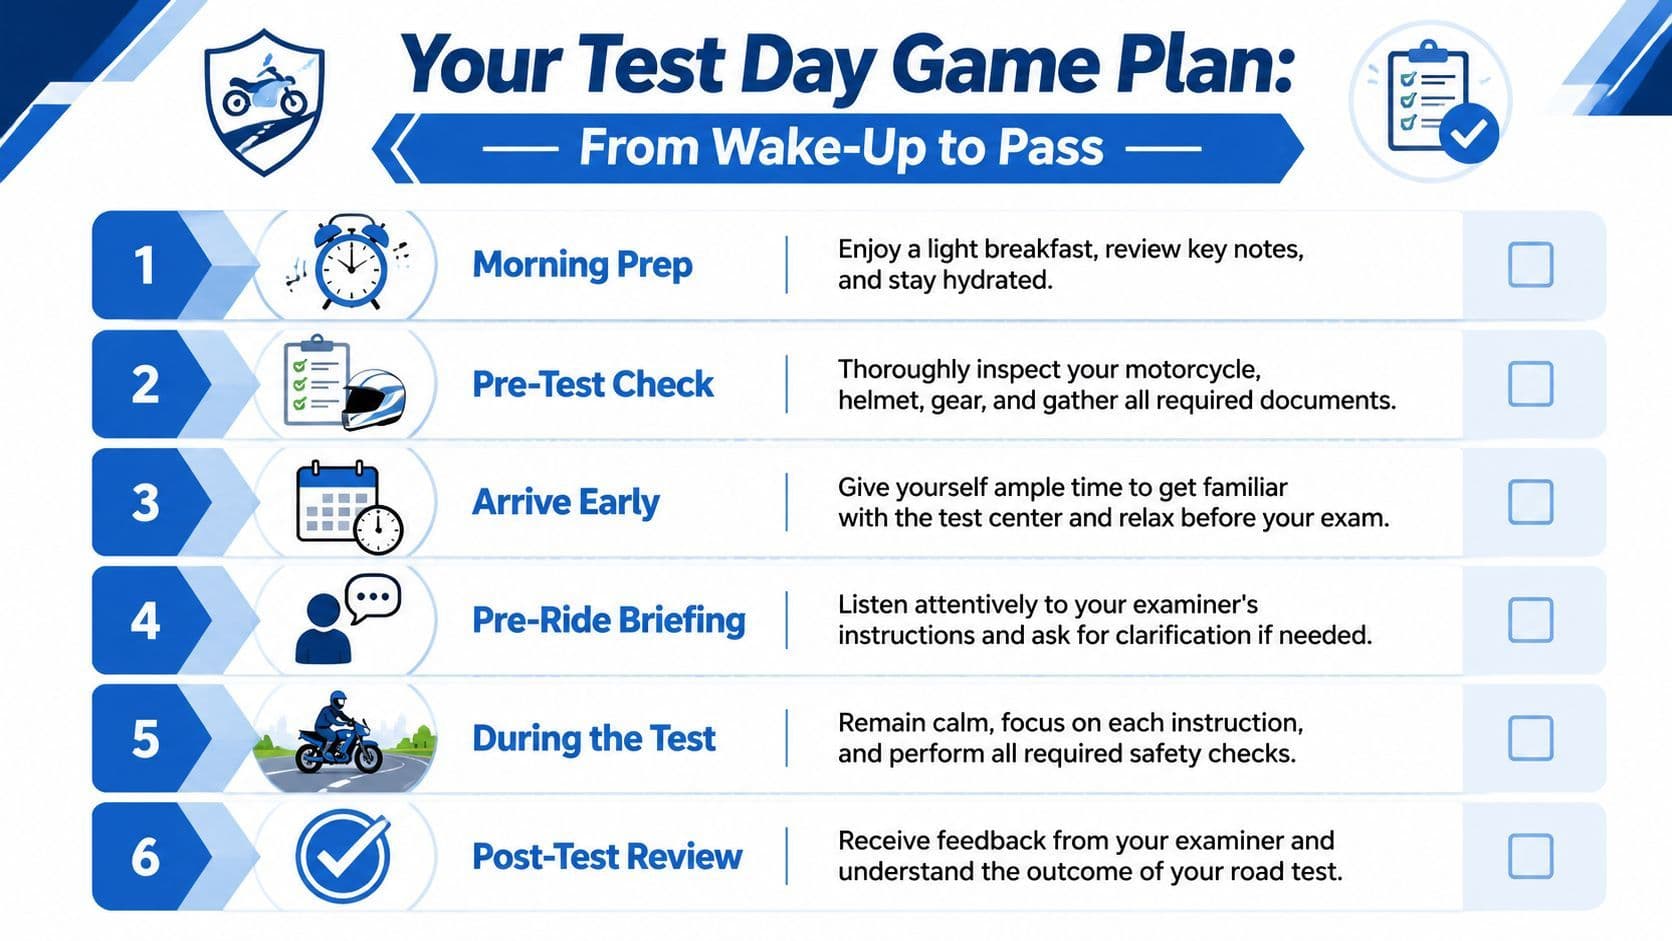
Before you leave home
Lay out your gear the night before. Put your documents in one place. Decide what you'll wear and don't change the plan in the morning unless weather forces it.
Eat lightly, drink some water, and give yourself enough time that you're not rushing. A rushed morning often leads to rushed riding.
At the test centre
Arrive early enough to settle in, not so early that you sit there stewing in your own nerves for too long. Once you're there, do one more calm check of your motorcycle, your helmet strap, your gloves, and your paperwork.
When the examiner gives instructions, listen carefully. If something isn't clear, ask politely before you start. That's better than guessing.
During the ride
Ride one instruction at a time. Don't score yourself while the test is happening. Riders lose focus when they replay the last stop sign instead of preparing for the next lane change.
Keep your checklist mental and simple:
- Head up
- Lane centre when appropriate
- Mirrors before slowing
- Clear shoulder checks
- Smooth inputs
- No panic after minor imperfections
If you feel nervous, lengthen your exhale at the next safe moment and loosen your grip on the bars. A death grip makes the bike feel worse than it is.
If something goes slightly wrong
Almost every rider has a moment they'd like back. Maybe a stop wasn't perfect. Maybe a turn felt a bit tight. That doesn't mean the test is over.
Recover immediately and keep the rest of the ride clean. Examiners notice composure. They notice whether you spiral after a small mistake or return to stable riding.
The best final piece of advice is simple. Don't try to impress the examiner. Give them a ride they can trust.
If you're still preparing for any part of the Ontario licensing journey, G1ready.ca is a practical place to study the rules side with free Ontario practice tests, clear explanations, and a mobile-friendly format that makes it easy to build confidence before test day.


