
You're driving through an Ontario intersection during a busy afternoon. A faded line beside the curb looks like a parking buffer, so you edge toward it without realising it's part of a bicycle lane. A cyclist appears beside your front wheel, and you have to brake and correct your position quickly. The problem wasn't a lack of care. You misread the pavement marking.
For a G1 learner, that mistake matters because road markings aren't decoration. They tell you where traffic moves, when you may cross a line, where you must stop, and which road users have priority. Ontario's markings are part of a provincewide engineering system governed through the Ontario Provincial Standards and Ontario Traffic Manual framework, so the same basic logic follows you from a residential street to a major highway.
This guide treats pavement marking Ontario rules as separate, testable concepts. You'll learn how to identify the marking, what it means in context, what you must do at the wheel, and which traps commonly confuse new drivers. Use the Ontario information signs guide alongside this topic, because signs and pavement markings often deliver one instruction together.
What You Will See on an Ontario Road
A G1 learner should read pavement markings in layers, like instructions on a route. First identify the direction of traffic. Then check for lines crossing your path, boundaries beside your lane, symbols inside it, and painted areas that separate traffic from a space you must avoid.
On a typical Ontario street, you may see:
- Yellow longitudinal lines separating traffic travelling in opposite directions.
- White longitudinal lines separating lanes moving in the same direction or marking the road edge.
- Stop lines, solid white bars showing where your vehicle must stop before an intersection.
- Yield lines, solid white triangles pointing toward approaching drivers.
- Crosswalks and pedestrian crossovers, which require you to respond to people crossing.
- Bicycle lanes and shared-lane symbols, which affect your position around cyclists.
- Turn arrows, which show the movement assigned to a lane.
- Diagonal hatch markings, which identify painted areas you must keep out of.
Treat each marking as a separate test question. If you see a stop line, ask, “What must I do?” Stop before the line, then follow the sign, signal, or traffic control at the intersection. If you see a turn arrow, ask, “Which movement does this lane allow?” Set your position early rather than crossing another lane at the last moment. If a bike-lane marking appears beside you, ask whether the lane belongs to cyclists before moving toward the curb.
The Ontario Traffic Manual gives these markings a defined visual language. Ordinary pavement markings and delineation are generally white, yellow, or orange, while blue and red are reserved for specific applications. The Ontario Traffic Manual Book 11 guidance describes the appearance and performance of markings used on roads.
Instructor's habit: Ask three questions: “Where is the marking, what pattern does it use, and what movement does it control?”
Use the Ontario information signs guide with this topic. On the G1 test and in real traffic, a sign and a pavement marking may deliver one instruction together. The practice prompts ahead help you turn each visual cue into the correct driving action.
How Ontario Uses Colour and Pattern
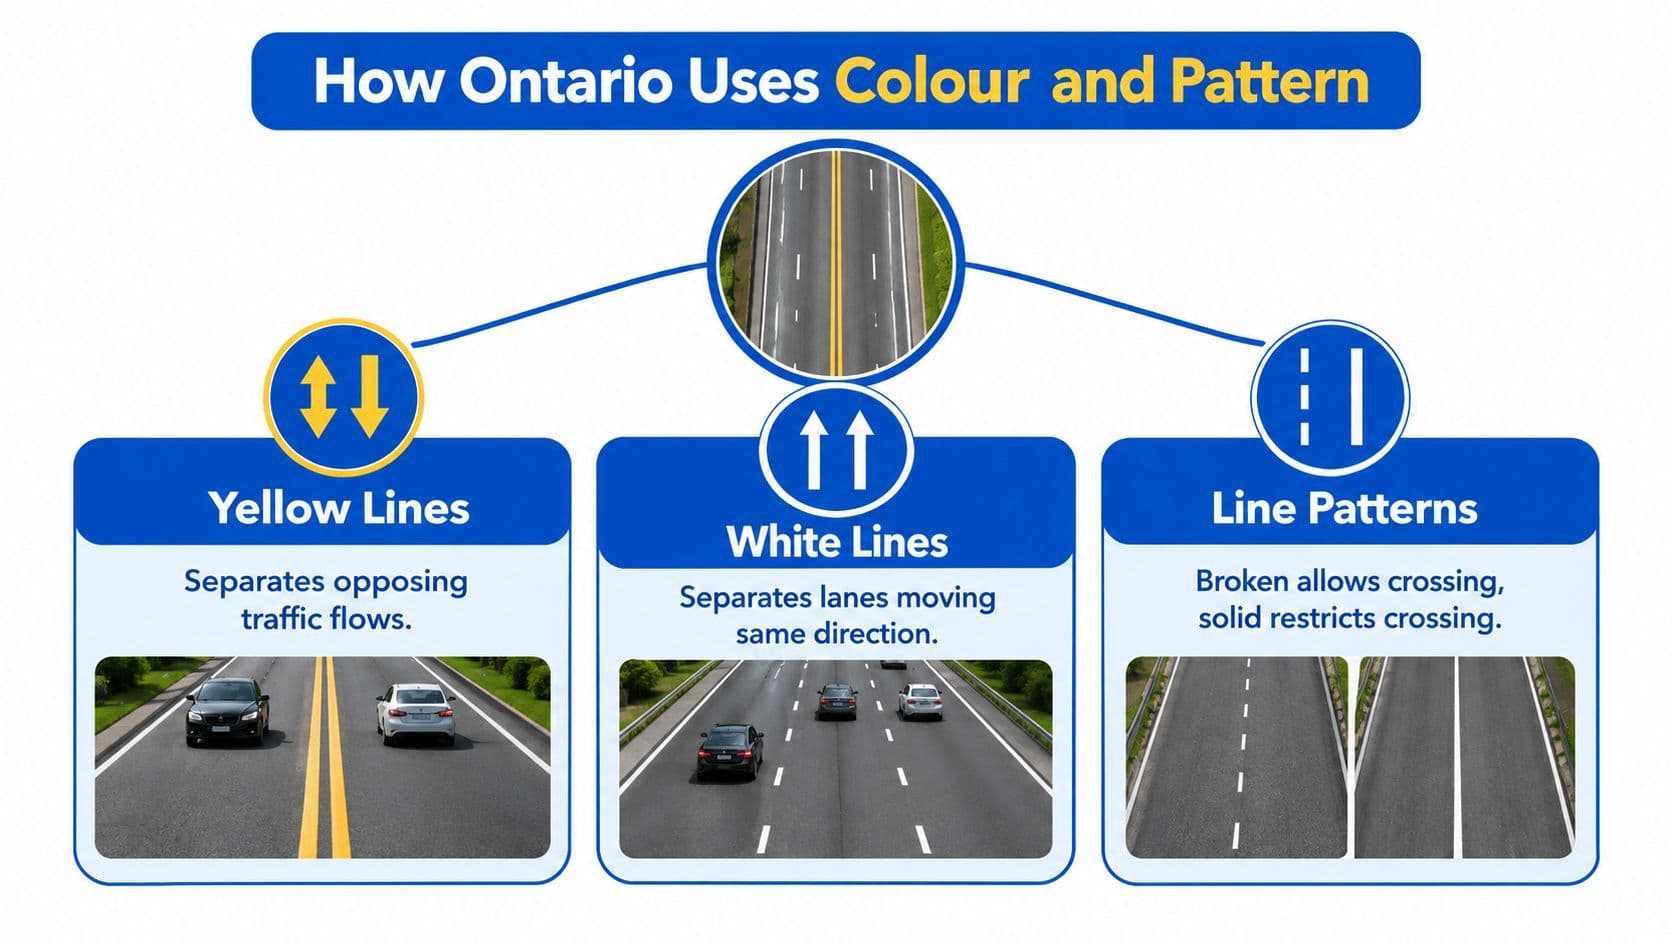
Ontario's pavement-marking system becomes easier once you read colour and pattern separately. Yellow normally separates opposing traffic flows. White normally separates lanes moving in the same direction, marks lane boundaries, or identifies a road edge. That first distinction tells you whether crossing a line could place you in the path of oncoming vehicles or move you between same-direction lanes.
Pattern adds the second instruction:
- Broken lines permit crossing when it's safe and the movement is legal.
- Solid lines restrict or prohibit crossing, depending on their location and purpose.
- Double solid lines create a stronger separation and generally prohibit crossing.
- Orange markings identify temporary or construction-related traffic arrangements.
- Special blue or red applications have limited meanings rather than serving as ordinary lane dividers.
Ontario's driver guidance explains the core families in practical terms. A single broken yellow line allows passing when the way ahead is clear. A single solid yellow line means you mustn't pass, although a driver may still turn left where the turn is otherwise permitted. A double solid yellow line means vehicles in either direction mustn't pass. A yellow line paired with a broken line permits passing only for the driver beside the broken line.
White markings work differently because they usually organise traffic moving the same way. A broken white line may be crossed for a safe lane change. A solid white line calls for greater caution and can prohibit or discourage crossing according to its location.
Try this decoding exercise. If a solid white line sits at the right edge of a multi-lane roadway, it's a boundary or restricted edge area, not an invitation to move across it. If a solid yellow line sits on your left, it separates you from opposing traffic and you mustn't cross it to pass. Position changes meaning, so never memorise colour without also studying the line's location and nearby signs.
Centre Lines and Edge Lines for Passing
Centre lines answer one question first: may you cross into the opposing lane to pass? Look at the yellow marking before considering your speed, visibility, or the vehicle ahead.
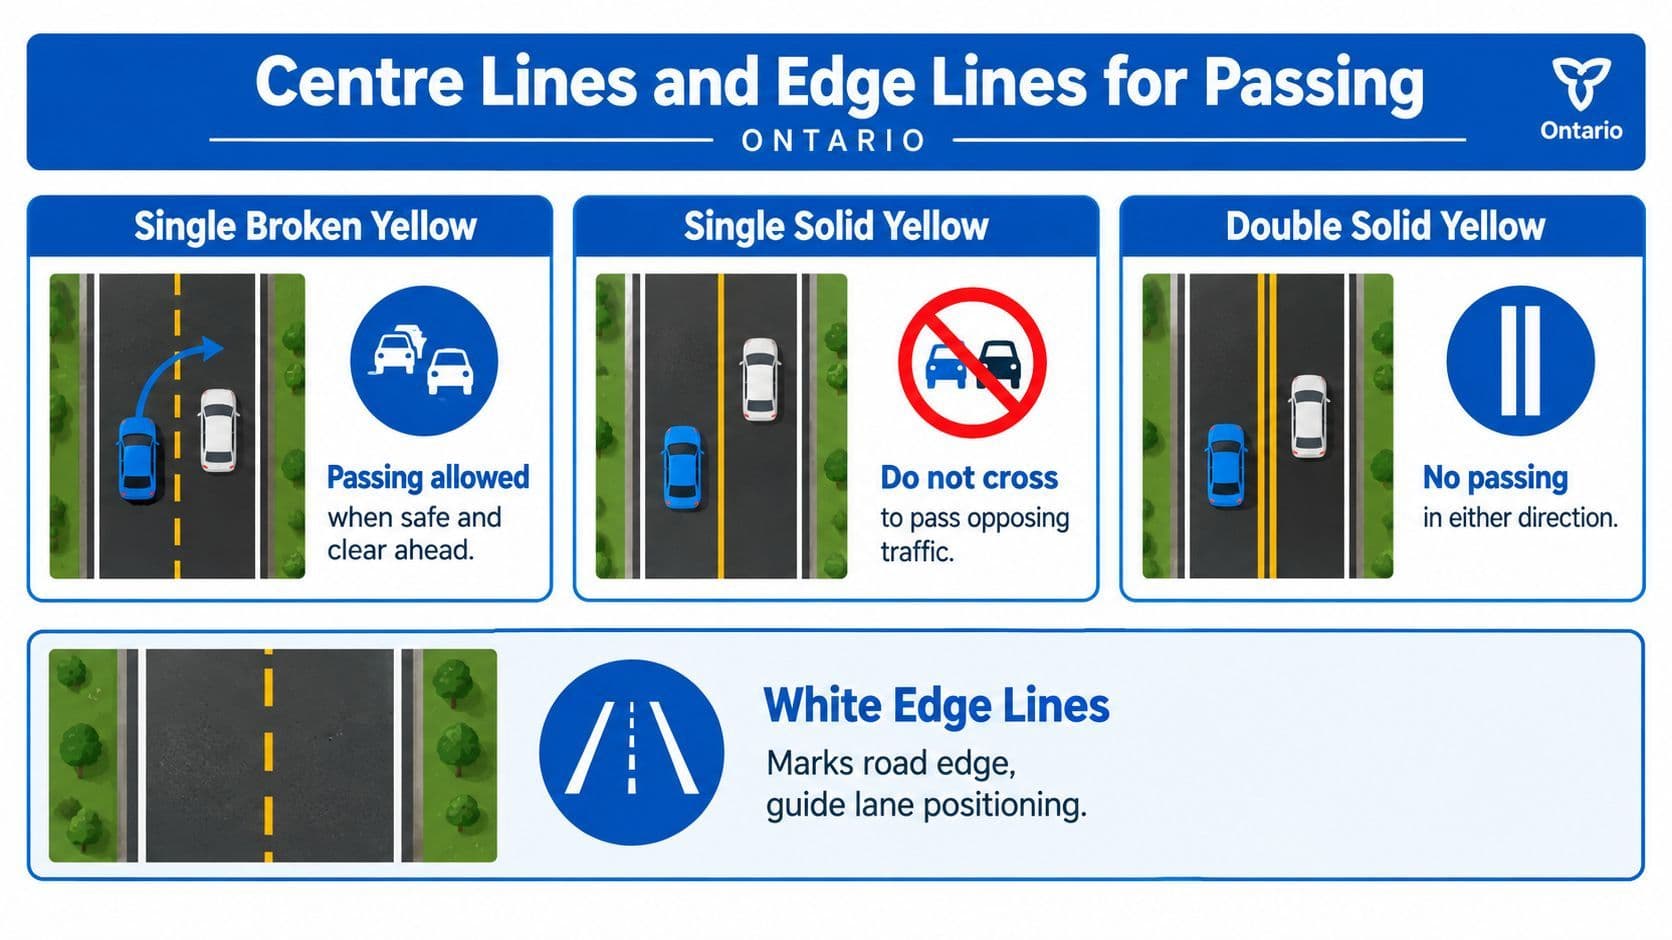
A single broken yellow line means passing may be permitted when the road ahead is clear, visibility is adequate, and the manoeuvre is otherwise safe and legal. It doesn't guarantee that passing is wise. You still need to check traffic, intersections, curves, hills, pedestrians, and signs before moving left.
A single solid yellow line means you mustn't cross to pass opposing traffic. However, this line doesn't automatically ban every leftward movement. If a left turn is allowed at a suitable opening, a driver may cross the line for that turn. That distinction creates a common G1 trap: a learner sees a solid yellow line and assumes it's a left-turn lane divider, then drifts across it while traffic is approaching from the opposite direction.
Reading double centre lines
A double solid yellow line is a no-passing barrier for both directions. It's used where passing would be especially dangerous, such as around restricted sight lines. Your response is simple: follow your lane and wait.
When one yellow line is solid and the other is broken, only the driver beside the broken line may cross to pass, assuming the road and traffic conditions make passing safe. The driver beside the solid line must remain in that lane. Don't use the other side's permission as your permission.
White edge lines have a different job. A solid white line along the right side helps you judge the edge of the travel lane and maintain position. On a multi-lane road, a solid white line near a ramp or intersection can discourage lane changes because the area may be handling merging, exiting, pedestrians, or other conflicts. Treat it as a signal to hold position unless the road design and markings clearly permit the movement.
Use this decision rule:
- Broken yellow beside you, consider passing only after checking safety.
- Solid yellow beside you, don't cross to pass.
- Double solid yellow, don't cross in either direction.
- Broken side of a mixed double line, passing may be allowed from your side.
- Solid white edge line, maintain lane position and don't cross casually.
Watch the accompanying visual for the comparison between centre and edge markings:
Intersection Markings That Control Your Stop
At an intersection, read the markings in a fixed order: find the stopping point, identify whether the sign requires stopping or yielding, then check the arrow before choosing your movement. Treat each marking as a separate test question.
A solid white stop line runs across your lane. If it appears with a stop sign or red light, stop before the line. Do not roll beyond it to reach the crosswalk, and do not stop on the crosswalk when the line gives you a clear stopping point. Ontario guidance describes stop lines as solid white retroreflective lines, generally between 30 cm and 60 cm wide. On the test, ask yourself: “Where is the first legal stopping point?”
A yield line uses solid white triangles with their points facing you. Near a yield sign or merging area, slow down, check vehicles and pedestrians, and give way before entering their path. Stop if necessary. Yielding means the other road user has priority when a conflict exists, so do not treat the marking as permission to continue without checking.
Lane arrows answer a different question: where may this lane take you? A white arrow tells you the movement assigned to that lane. Enter only through a broken lane boundary and only when the arrow matches your plan. If the arrow points left, turn left at the next intersection. If it points straight, continue straight where the lane layout requires it. Read the arrow before entering, not after reaching the stop line.
Marking What It Looks Like What You Must Do Stop line Solid white bar across the lane Stop before the line Yield line Solid white triangles pointing toward you Slow, yield, and stop if needed Turn-lane boundary White solid and broken lane lines Enter only at a permitted broken section Lane arrow White directional arrow Follow the indicated movement
Practice prompt: you approach a red light with a stop line before a crosswalk. Stop at the line. A left-only lane does not become a through lane because traffic ahead is inconvenient. Follow the marking you entered.
Pedestrian Crosswalks and Crossovers
Pedestrian markings can look similar from a distance, but the surrounding signs and road design determine your obligation. Treat every marked crossing as a place where a person may enter your path, and reduce speed early enough to stop smoothly.
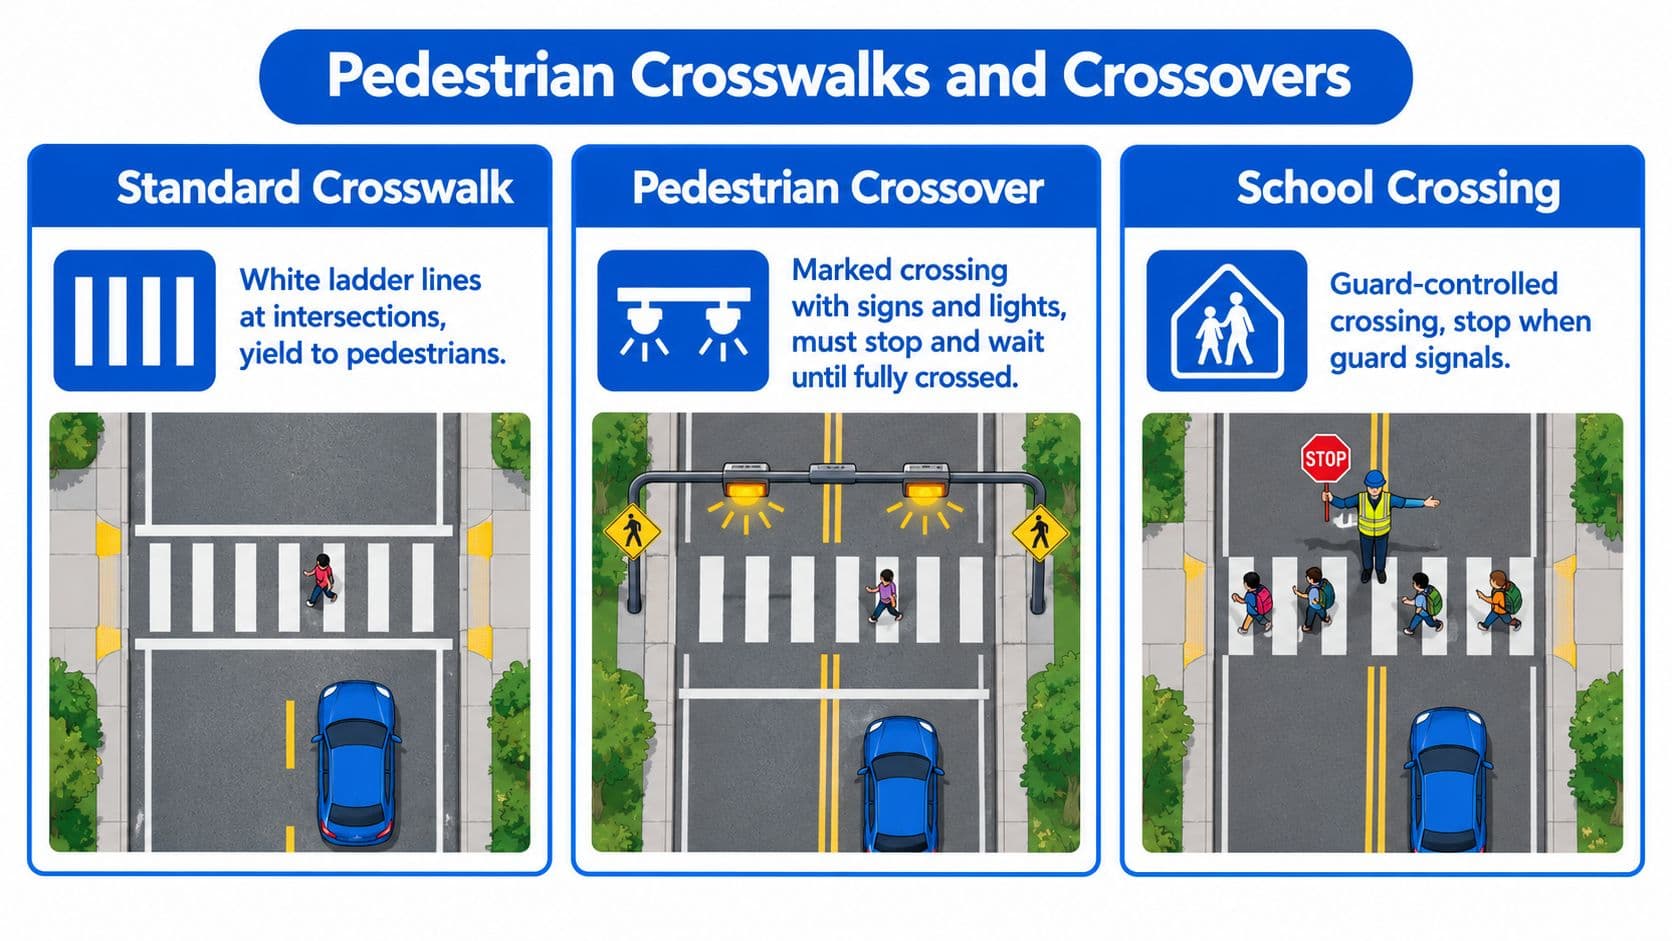
A standard crosswalk usually appears as parallel white lines extending across the road, often at an intersection. Yield to pedestrians who are already in the crosswalk, and don't stop on the marked crossing. If a stop line appears before it, stop at the line rather than blocking the pedestrian route.
A school crossing may use a similar parallel-line pattern, but the fluorescent yellow-green school crossing sign identifies the school context. Children can be unpredictable, so approach slowly and be prepared to stop for a pedestrian who is entering or waiting to enter the crossing. Follow any crossing guard's directions.
A pedestrian crossover, commonly called a PXO, is a designated crossing that may be marked with white rectangular lines, signs, and flashing beacons. Ontario rules require drivers to stop and yield to pedestrians in the crossover. You also mustn't pass another vehicle that has stopped for a pedestrian at the crossover. Remain stopped until the person has cleared your path and it's safe to proceed.
Practice question: You approach a marked crossing and see a pedestrian waiting at the edge. Which crossing treatment requires the clearest full-stop response, rather than a casual rolling yield?
The correct reasoning is to identify a pedestrian crossover and stop as required. A standard crosswalk still demands careful yielding to pedestrians in the crossing, but learners shouldn't assume that all crossing treatments create identical duties. Review the Ontario pedestrian crossing rules guide and practise identifying the crossing from its signs, signals, and pavement layout.
Bike Lanes and Hatch Markings
A reserved bicycle lane often combines a solid white boundary line, a bicycle symbol, and a diamond marking. That combination tells you the lane is reserved for cycling. Don't drive, stop, or park in it as part of ordinary travel.
There's a limited crossing situation when you need to reach a driveway or turn lane. If the bicycle-lane boundary becomes dashed, cross carefully after checking for cyclists and completing the intended manoeuvre safely. Don't enter early just because your turn is coming up. Position your vehicle where the marking permits the crossing.
Shared-use lanes use a bicycle symbol with chevrons, often called sharrows. They don't create a separate bicycle lane. Cars and bicycles share the full lane, so a driver must give the cyclist room, avoid squeezing the rider toward the curb, and wait for a safe opportunity to pass. The Ontario bicycle rules guide provides related G1 preparation on cyclist interactions.
Reading painted buffers
Diagonal white stripes between boundary lines create a hatched area. The stripes may separate turn lanes, channelise traffic, or protect a central area. Don't drive over the hatch just to gain space or bypass congestion.
Use this checklist when a bike lane and hatch area appear together:
- Solid bike-lane line: Stay out of the lane during normal travel.
- Dashed bike-lane line: Cross only for the permitted turn or access movement, after checking for cyclists.
- Chevron buffer: Treat the striped area as closed to driving.
- Shared-lane symbol: Remain in the lane and give cyclists safe space.
- Cyclist beside you: Slow down and wait rather than forcing a pass.
The visual distinction matters. A reserved lane protects a defined cycling space. A sharrow warns that the lane itself is shared. A hatched buffer separates traffic paths and isn't a spare lane.
Obstruction, Construction, and Continuity Markings
Some markings appear only where the road geometry creates a special hazard. They're easy to miss because learners focus on the familiar centre line, but the G1 test can ask what a driver should do when a line or symbol interrupts the normal pattern.
Obstruction markings use diagonal stripes or contrasting patterns around hazards such as medians, bridge supports, curb extensions, and other objects close to moving traffic. Yellow and black stripes can identify certain structures, and Ontario guidance specifies striped sections and stripe widths for those applications in Book 11. Your response is to keep clear, follow the channelised path, and never treat the striped area as usable pavement.
Construction markings temporarily reorganise the road. Orange lines, tapers, and buffer zones may shift traffic away from work areas or place lanes in a different arrangement. Follow the temporary layout, signs, and traffic-control devices even when they conflict with the familiar permanent markings. Slow down before the taper and merge where the temporary design directs you.
Continuity lines and painted islands
A continuity line may continue across a driveway or intersection to show how a lane proceeds through the conflict area. It doesn't automatically tell you to change lanes. Stay in your lane unless another marking, sign, or traffic condition requires a safe movement.
Painted island chevrons identify space that separates traffic streams. Keep your wheels out of the island. A raised median is a physical barrier, while a painted median is a marked exclusion area. Neither should be treated as a normal travel lane.
Rumble strips provide a physical warning through vibration, while the painted markings around them provide visual guidance. If the road narrows, the edge marking disappears, or construction lines redirect traffic, reduce speed and follow the most current visible control.
Legal Implications for G1 Drivers
A pavement marking creates a road-use instruction, and ignoring it can become more than a knowledge-test error. Crossing a no-passing line, stopping beyond a stop line, entering a restricted bicycle lane, or turning from the wrong lane may expose you to enforcement under Ontario traffic law.
The exact penalty depends on the offence, circumstances, and charge. It would be unsafe to memorise a generic fine or demerit number for every marking because the legal outcome isn't determined by paint alone. The driver's action, the sign or signal nearby, the road location, and the applicable Highway Traffic Act provision all matter.
For study purposes, connect the marking to the conduct:
Marking Violation Demerit Points Fine Range G1 Note Crossing a solid yellow to pass Depends on the offence charged Depends on the offence charged Don't cross to pass Failing to stop at a stop line Depends on the offence charged Depends on the offence charged Stop before the line Turning from a designated lane incorrectly Depends on the offence charged Depends on the offence charged Follow the lane arrow Driving in a reserved bicycle lane Depends on the offence charged Depends on the offence charged Stay out unless the movement is permitted Ignoring a pedestrian crossover Depends on the offence charged Depends on the offence charged Stop and yield as required
A G1 driver must drive with a qualified accompanying driver and must maintain zero blood alcohol. Those conditions make disciplined decision-making especially important, but they don't replace the ordinary duty to obey markings and signals. Don't assume a learner licence turns a marking mistake into a warning.
Construction areas need extra care because temporary markings can override the permanent road layout. Read the complete arrangement, including signs, cones, tapers, barriers, and workers. If you can't tell which line controls, slow down and follow the temporary traffic direction instead of guessing.
Why Ontario Markings Look the Way They Do
A G1 question may show only a few painted lines, yet each one gives different instructions. Start with the colour code. Yellow separates traffic travelling in opposite directions. White separates lanes moving in the same direction or marks a boundary. Use that first clue to identify the possible conflict, then read the line pattern and nearby signs before choosing an action.
The paint must remain visible in darkness, rain, and changing road conditions. Ontario specifications cover materials including water-borne traffic paint, thermoplastic, field-reacted polymeric materials, preformed plastic tape, organic solvent-based traffic paint, and reflectorising glass beads through OPSS.PROV 710. Reflectivity is part of the marking's intended performance, not merely its appearance. Provincial guidance describes a reflective performance threshold of 150 mcd/m² lx for yellow and orange markings, measured under ASTM E1710, as described in Ontario Traffic Manual Book 11.
Why lines fade and return
Road markings wear under winter traffic, salt, snowploughs, construction, and poor surface preparation. Toronto identifies waterborne paint, field-reacted polymeric material, and preformed thermoplastic among its marking materials. Its maintenance information describes repainting from June 1 to October 31, including two coats on key markings, to restore visibility. These markings support lane boundaries, turn movements, crosswalks, stop lines, and bicycle lanes.
A line can therefore look sharp in one municipality and worn in another. Road surface, traffic volume, weather exposure, and local maintenance schedules all affect its condition.
A faded line still calls for caution. Combine the visible pattern with signs, lane position, road shape, and traffic flow. Never treat missing paint as permission to cross.
On the G1 test, markings represent intended rules rather than flawless paint. Learn what each colour and pattern requires, then slow down and reassess when visibility is poor or temporary markings change the usual layout.
Quick Reference and Practice Prompts
Use this table as a final visual check. The action column is the part you need to remember under pressure.
Marking Colour What It Means What You Must Do Single broken centre line Yellow Passing may be allowed when safe Check fully, then pass only if legal and clear Single solid centre line Yellow No passing across the line Hold position, but turn left only where permitted Double solid centre line Yellow No passing in either direction Stay in your lane Broken white lane line White Same-direction lane separation Change lanes only when safe Solid white edge line White Road edge or restricted boundary Maintain lane position Stop line White Required stopping point Stop before the line Yield line White Yield point before entering traffic Slow, yield, and stop if needed Bicycle lane boundary White Reserved cycling space Stay out unless crossing is permitted for a manoeuvre Hatch markings White Exclusion or channelisation area Don't drive over the painted area Temporary construction line Orange Temporary traffic path Follow the temporary layout Continuity line White Lane path through a conflict area Continue in lane unless directed otherwise
Test yourself
- You see a single broken yellow line and have a clear view ahead. What does the line permit?
A. Passing may be considered when safe
B. Passing is prohibited in every situation
C. You must turn left
D. You must stop immediately - You approach a red light with a solid white stop line before the crosswalk. Where do you stop?
A. On the crosswalk
B. Past the intersection
C. Before the stop line
D. Beside the curb - Your lane contains a left-only arrow. What must you do?
A. Continue straight if traffic is light
B. Turn left at the next intersection
C. Change into any lane after the stop line
D. Stop and wait for a green arrow - A bicycle lane has a solid white boundary. May you use it to pass a slow vehicle?
A. Yes, if no cyclist is visible
B. Yes, during daylight
C. No, not for ordinary travel
D. Only if you sound the horn - You approach diagonal white hatch markings between traffic lanes. What's the correct response?
A. Drive over them to shorten the route
B. Use them as a temporary passing lane
C. Keep out of the painted area
D. Stop in the centre of the hatch
Answer key:
- A, a broken yellow line may permit passing when the road and traffic conditions make it safe.
- C, the stop line marks the stopping point before the crosswalk and intersection.
- B, a left-only arrow assigns the lane to a left turn.
- C, a reserved bicycle lane isn't for ordinary vehicle travel.
- C, hatch markings identify an area used to separate or channelise traffic.
Review each wrong answer by asking what the marking controls: opposing traffic, same-direction lanes, stopping, yielding, cycling space, or exclusion. Then practise the rule in a fresh scenario rather than memorising the letter.
Visit G1ready.ca to practise Ontario G1 questions on pavement markings, stop lines, crosswalks, arrows, bicycle lanes, and other road rules with immediate explanations and hints. Use targeted quizzes, mixed tests, and the exam simulator to identify weak areas before you book your G1 test.


